As an Amazon Associate GolferHive.com earns from qualifying purchases.
9 Golf Themed Cakes Beginner To Expert Designs and Tips
Struggling to find the perfect centerpiece for a golf lover’s celebration? You want something personal, impressive, and memorable.
A golf themed cake is a celebratory dessert designed with visual elements like fairways and golf equipment. But executing these custom golf cakes can feel overwhelming, especially if you’re worried about common fails like bitter green frosting or a leaning structure.
A Golf Themed Cake is a celebratory dessert designed to incorporate visual elements like the fairway, sand traps, or golf equipment, often used for birthdays, retirements, or tournament celebrations to create a personalized, high-impact centerpiece. This guide breaks down nine unique golf cakes, ranked from easy to expert, giving you failure-proof instructions for a hole-in-one celebration.
The Golfer’s Dream: Why Themed Cakes Are the Perfect Celebration Centerpiece
A custom golf cake is more than just a dessert; it’s a personalized tribute that becomes the visual anchor of any celebration. For a golf enthusiast, seeing their passion brought to life in an edible golf course cake transforms a simple birthday into an unforgettable event. These cakes serve as a high-impact centerpiece, sparking conversation and creating the perfect photo opportunity.
The true value lies in the personalization. Whether it’s a simple “hole in one” cake for a major milestone or a detailed replica of their favorite course, the design shows you understand what they love. Our designs and tips, curated from professional pastry arts principles and hands-on experience in themed baking, are here to guide you. We’ve created a unique framework, categorizing each design by skill level—from Par-3 (Beginner) to Par-5 (Expert)—to ensure you can find and execute the perfect golfer cake with confidence.
9 Golf Themed Cakes: Designs Ranked Par-3 (Easy) to Par-5 (Expert)
Choosing the right design is about matching your ambition with your current skill level. A stunning golf themed cake doesn’t have to be impossibly complex. To help you succeed, we’ve ranked 9 popular designs using a simple golf-inspired difficulty scale. Par-3 designs are perfect for beginners, relying on simple buttercream techniques. Par-4 designs introduce intermediate skills like cake carving and shaping. Par-5 designs are for the expert baker ready to tackle advanced structural support, 3D sculpting, and complex materials like modeling chocolate.
Here are the 9 golf themed cakes that will guarantee a win at your next event:
1. The Simple Putting Green Sheet Cake (Par-3)
2. Easy Pull-Apart Golf Course Cupcakes (Par-3)
3. Hole-in-One Minimalist Cake (Par-3)
4. Realistic Sand Trap Sheet Cake (Par-4)
5. Proportional Terrain Cake (Par-4)
6. Edible Golf Ball Dimple Cake (Par-4)
7. Tiered 18th Hole Course (Par-5)
8. 3D Sculpted Golf Bag Cake (Par-5)
9. Reflective Water Hazard Cake (Par-5)
1. The Simple Putting Green Sheet Cake (Par-3)
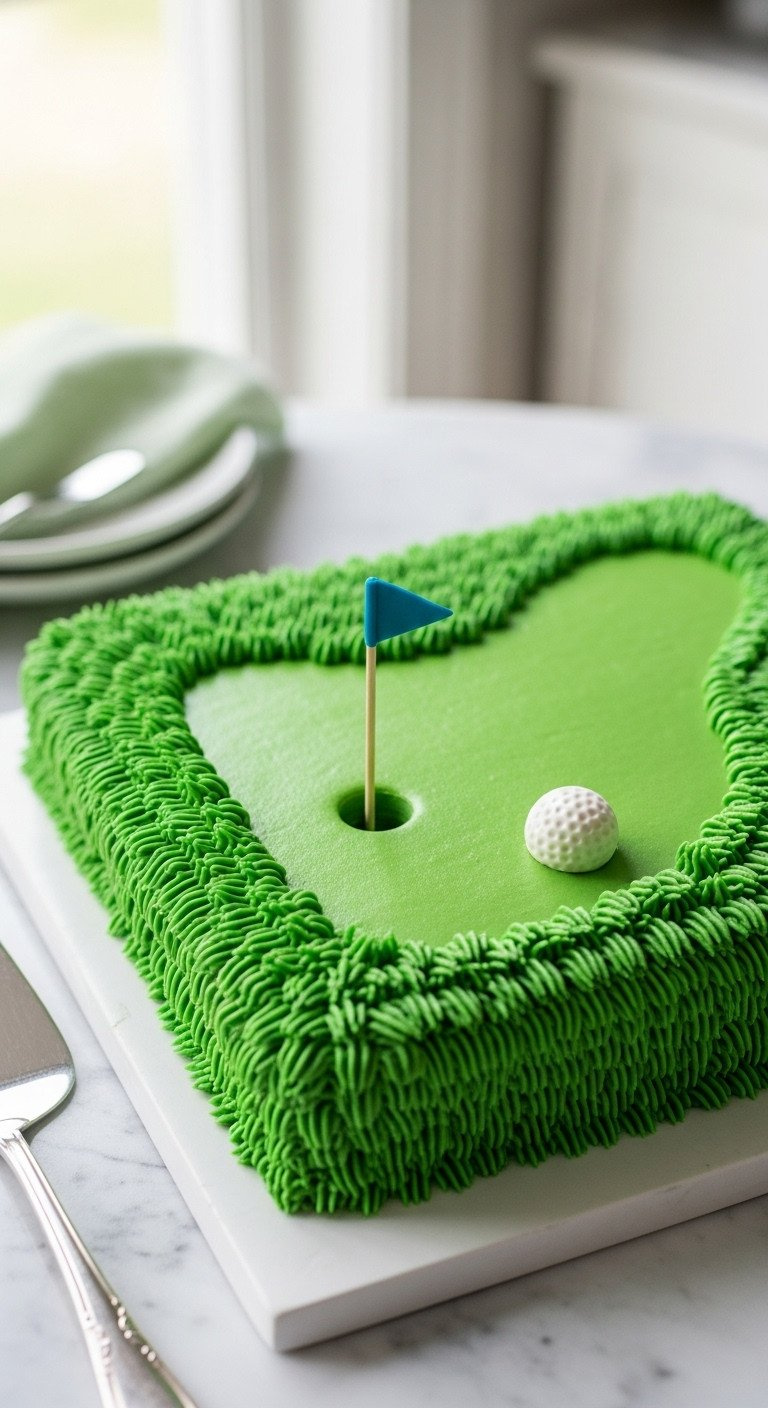
Pin this genius tips to your ‘Easy Baking Ideas’ board!
This classic design is the perfect starting point for any beginner. The star of the show is the realistic grass texture, which is surprisingly easy to achieve with the right tool and technique. A rectangular sheet cake provides a large, flat canvas, making it a forgiving and fun project.
Materials Needed:
- One 9×13 inch cooled sheet cake (any flavor)
- 4 cups Stiff American Buttercream or stabilized Swiss Meringue
- Concentrated gel food coloring (Fairway Green—avoid liquid dyes)
- Wilton #233 Grass Piping Tip Set
- Piping bag and coupler
- Small edible golf ball or white fondant sphere
Step-by-Step Directions:
- Crumb Coat & Chill: Crumb coat the entire cake with a thin layer of white icing; chill for 30 minutes to lock in crumbs. This is an essential step to prevent loose crumbs from mixing into your final green fairway frosting.
- Color the Frosting: Mix the remaining buttercream with the green gel color, starting sparingly. For a more realistic, earthy tone, add a tiny drop of brown food coloring to mute the artificial brightness.
- Prep for Piping: Fill the piping bag fitted with the #233 tip. Ensure the buttercream is firm and cool, as warm frosting will cause the grass to droop.
- Piping the Grass: Hold the tip directly against the cake surface, squeeze firmly, and pull up sharply as you release pressure. This creates short, varied strands that look like real grass.
- Create the Hole: Pipe green grass up to a defined circle. Fill the circle with a small amount of dark brown or black frosting to mimic depth.
- Final Touch: Place the edible golf ball near the hole to complete the scene.
Pro-Tip: The key to standing grass is stiff buttercream and consistent pressure. If the grass droops, your frosting is too soft; chill it for 15 minutes or add a bit more powdered sugar.
2. Easy Pull-Apart Golf Course Cupcakes (Par-3)
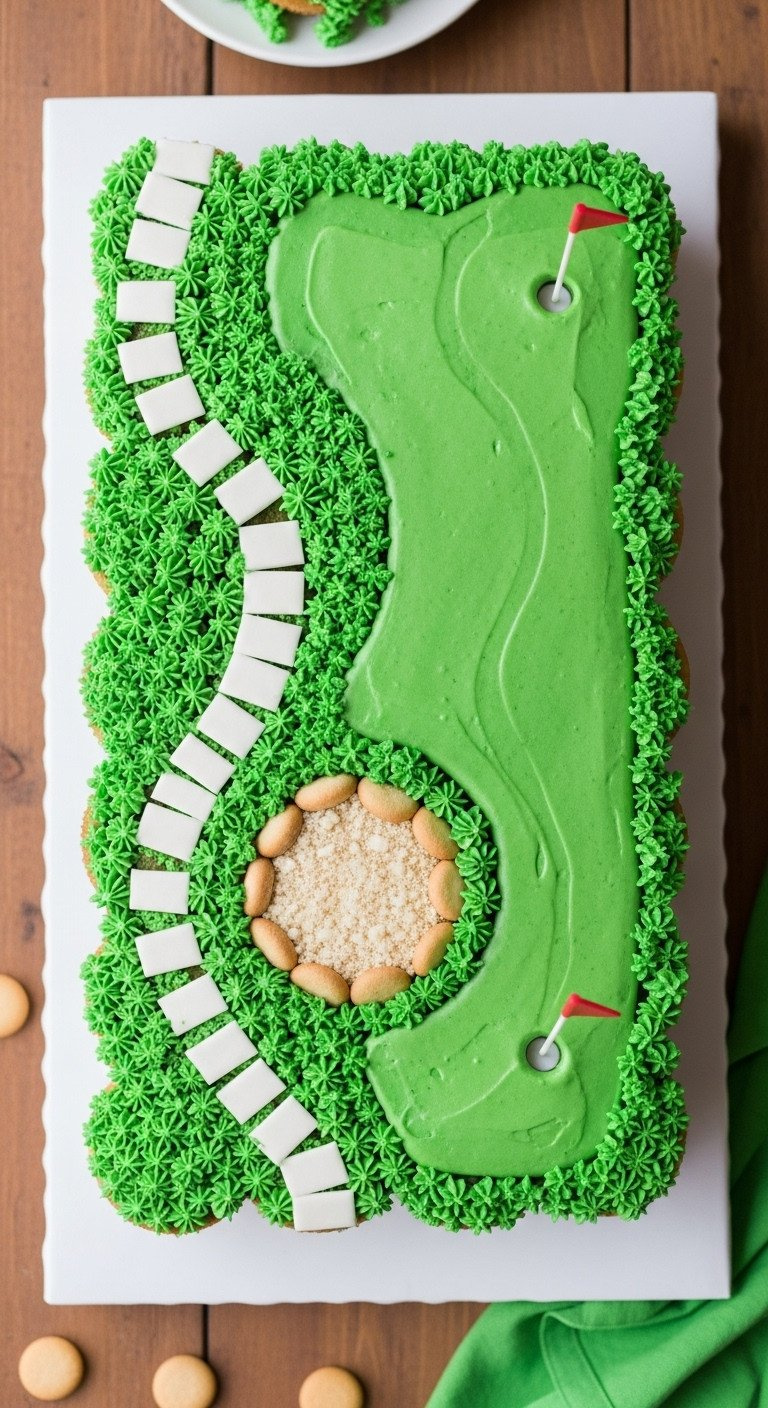
Save this clever organization idea for serving large groups!
For a casual golf party or a kid’s birthday, nothing beats the convenience of a pull-apart cupcake cake. This idea creates the illusion of a single, unified golf course but allows for easy, no-mess serving. The key is creating a seamless frosting surface that hides the individual cupcakes beneath.
Materials Needed:
- 24 standard-sized cupcakes (baked and cooled)
- Large rectangular presentation platter or board
- 6 cups medium-consistency green buttercream
- White buttercream (for paths/lines)
- Finely crushed vanilla wafers or graham crackers (for sand)
- Miniature golf flag toppers
Step-by-Step Directions:
- Arrange the Course: Tightly arrange the 24 cupcakes in a large rectangle (e.g., 4 rows of 6) on the platter so they are touching. Their tops should form one continuous surface.
- Base Coat: Using a large offset spatula, apply a generous layer of the green buttercream, spreading it seamlessly over all the cupcakes so the individual seams disappear.
- Add the Sand Trap: Define a small, curved area where the sand trap will be. Lightly brush this area with thinned corn syrup or clear piping gel to create a tacky surface.
- Texture the Sand: Gently sprinkle the crushed vanilla wafers or graham cracker crumbs heavily onto the tacky surface, pressing lightly to secure them.
- Piping Details: Use white buttercream in a piping bag with a small round tip (like a Wilton #3) to pipe white stripes or yardage markers onto the green surface.
- Finish with Toppers: Insert the miniature flags and place edible golf ball candies strategically to complete your course.
Pro-Tip: Using a buttercream made with high-ratio shortening helps the frosting stay firm at room temperature. This prevents the cupcakes from shifting or the seams from reappearing as the dessert sits out.
3. The Hole-in-One Minimalist Cake (Par-3)
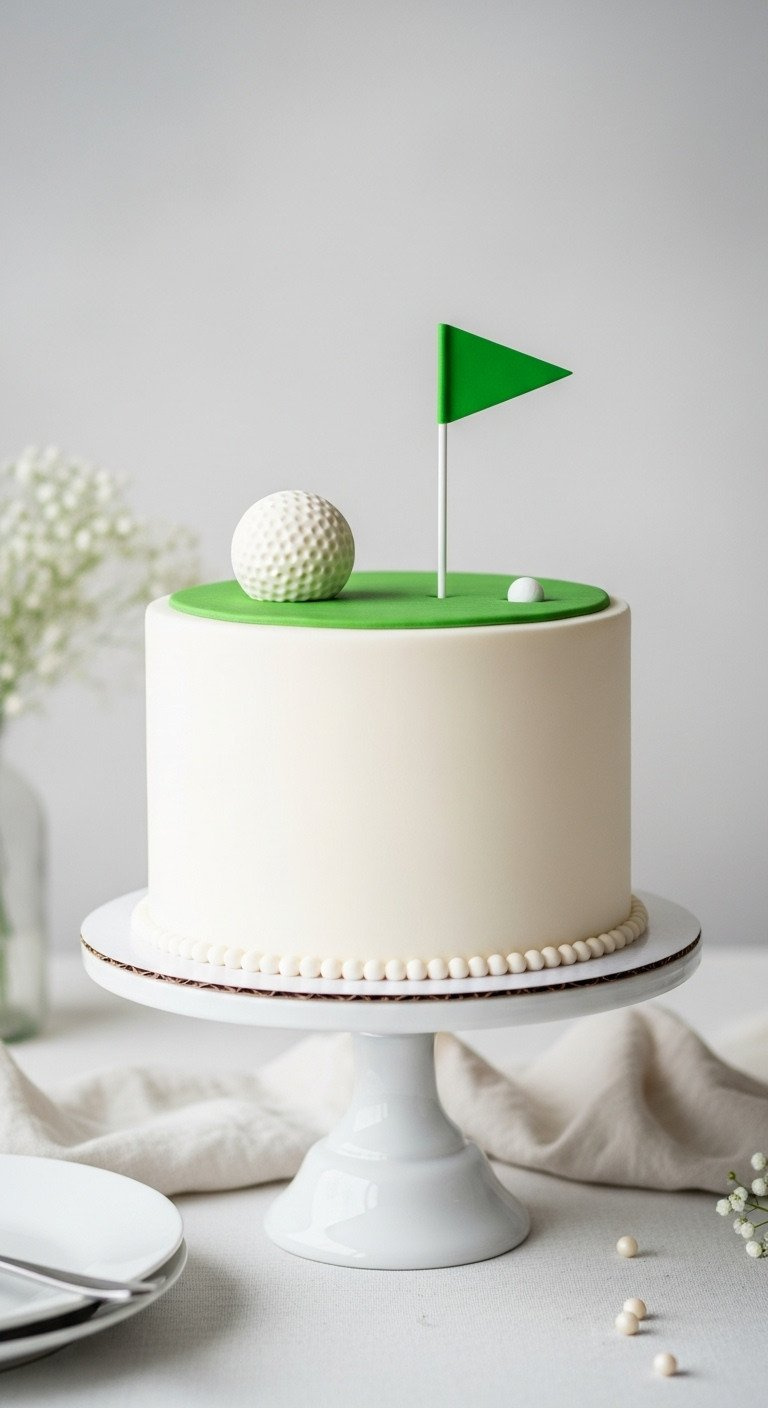
Pin this clean, modern design for a sleek celebration!
Perfect for a sophisticated adult birthday or a “hole in one” celebration, this modern design proves that less is more. It relies on a pristine, smooth fondant finish and a single, well-executed focal point. The elegance comes from precision, not complexity.
Materials Needed:
- One 8-inch round cake (fully chilled and crumb coated)
- 24 oz premium white fondant
- One 3-inch white sphere of fondant or gumpaste (for the golf ball)
- Golf ball dimple impression tool or large round piping tip
- Edible glue or water
- One food-safe golf flag topper or small gumpaste flag
Step-by-Step Directions:
- Cover the Cake: Roll out the white fondant smoothly and cover the chilled, crumb-coated cake. Use a fondant smoother to achieve sharp, clean edges and trim any excess.
- Create the Golf Ball: Take the white fondant sphere and gently use the dimple impression tool (or the large, round end of a piping tip) to press small, shallow dimples across the entire surface to mimic the golf ball texture.
- Make the Hole Indentation: Using the end of a round tool or the base of the flag pole, create a slight indentation near the edge of the cake where the “hole” will be.
- Attach the Ball: Affix the textured golf ball near the indentation using a small amount of edible glue or water.
- Insert the Flag: Securely insert the food-safe flag topper into the indentation. If you’re using a custom gumpaste flag, make sure the pole is completely dry before inserting it.
Lesson Learned: Fondant stretches best when it’s slightly warm from being kneaded. If it tears while you’re covering the cake, don’t panic. Gently knead in a tiny bit of shortening to increase its elasticity before trying again.
4. Realistic Sand Trap Sheet Cake (Par-4)
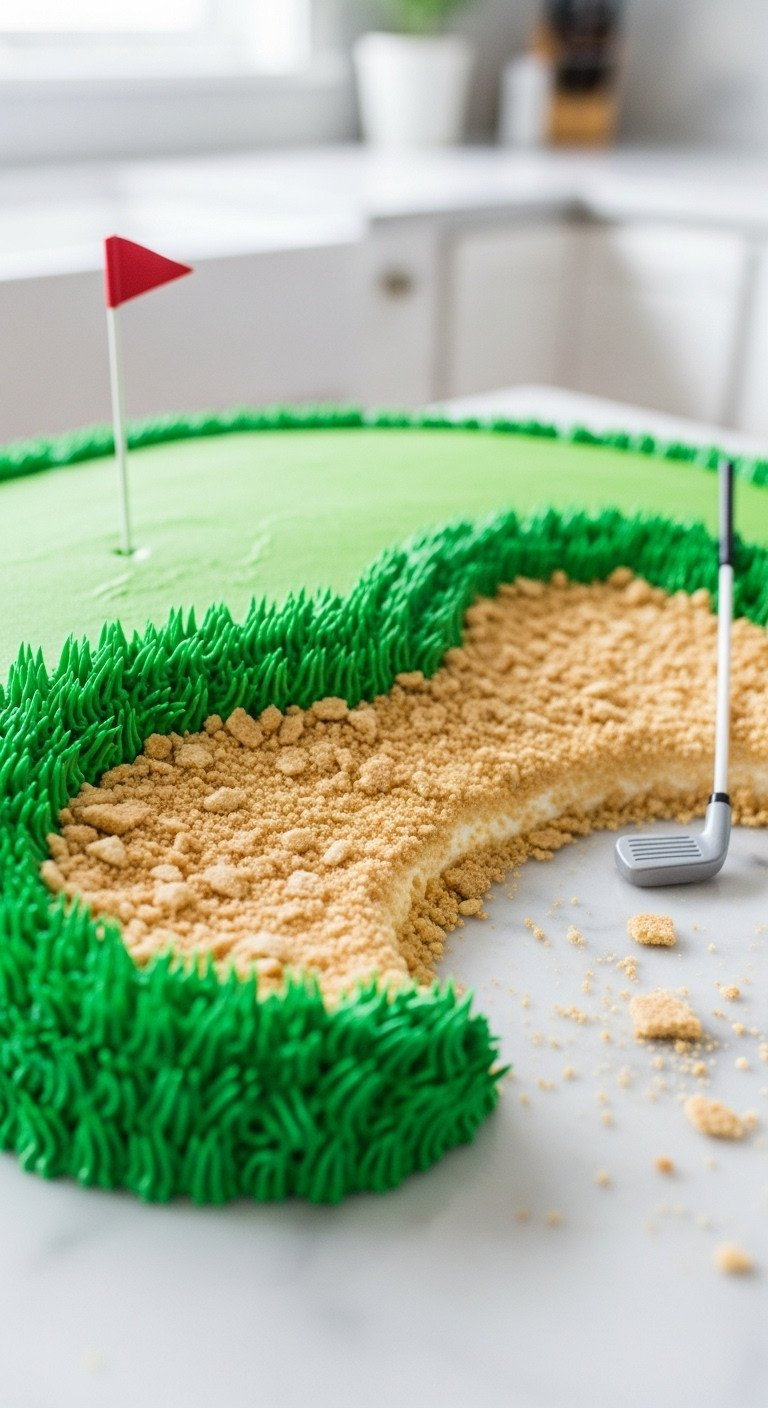
Save this tutorial for the perfect realistic edible sand!
The secret to a truly impressive golf course cake lies in the textures. Mastering the realistic sand trap, or bunker, is an intermediate skill that elevates any design. This technique focuses on creating a textured area that holds its shape and provides a stunning contrast against the green fairway.
Materials Needed:
- Cooled cake base (already covered in green frosting)
- 1 cup fine edible crumbs (crushed vanilla wafers or graham crackers)
- Small jar of neutral piping gel or thinned corn syrup
- Small offset spatula
- Fine mesh sieve
Step-by-Step Directions:
- Crush the Crumbs: For the most realistic sand texture, ensure your crumbs are uniformly fine. Using a food processor is the best way to achieve this.
- Define the Bunker: Use a small offset spatula or the back of a spoon to carve a slightly indented, curved area on your green frosted cake where the sand trap will sit.
- Apply the Adhesive: With a clean, dry brush or a small spatula, apply a thin, even layer of clear piping gel or thinned corn syrup only inside the bunker area. The frosting needs to be tacky but not overly wet.
- Sieve the Sand: Hold the fine mesh sieve above the cake and gently tap the fine crumbs over the tacky area, allowing a generous, even layer to form.
- Secure and Clean: Lightly press the crumbs down with the back of a clean spoon to secure them. Use a clean, dry paintbrush to gently sweep away any loose crumbs from the surrounding grass area.
Pro-Tip: Using crushed vanilla wafers or graham crackers gives a pale, authentic sand color. Brown sugar can also work but often looks more like coarse dirt, which is better for representing the “rough” area of the course.
5. The Proportional Terrain Cake (Par-4)
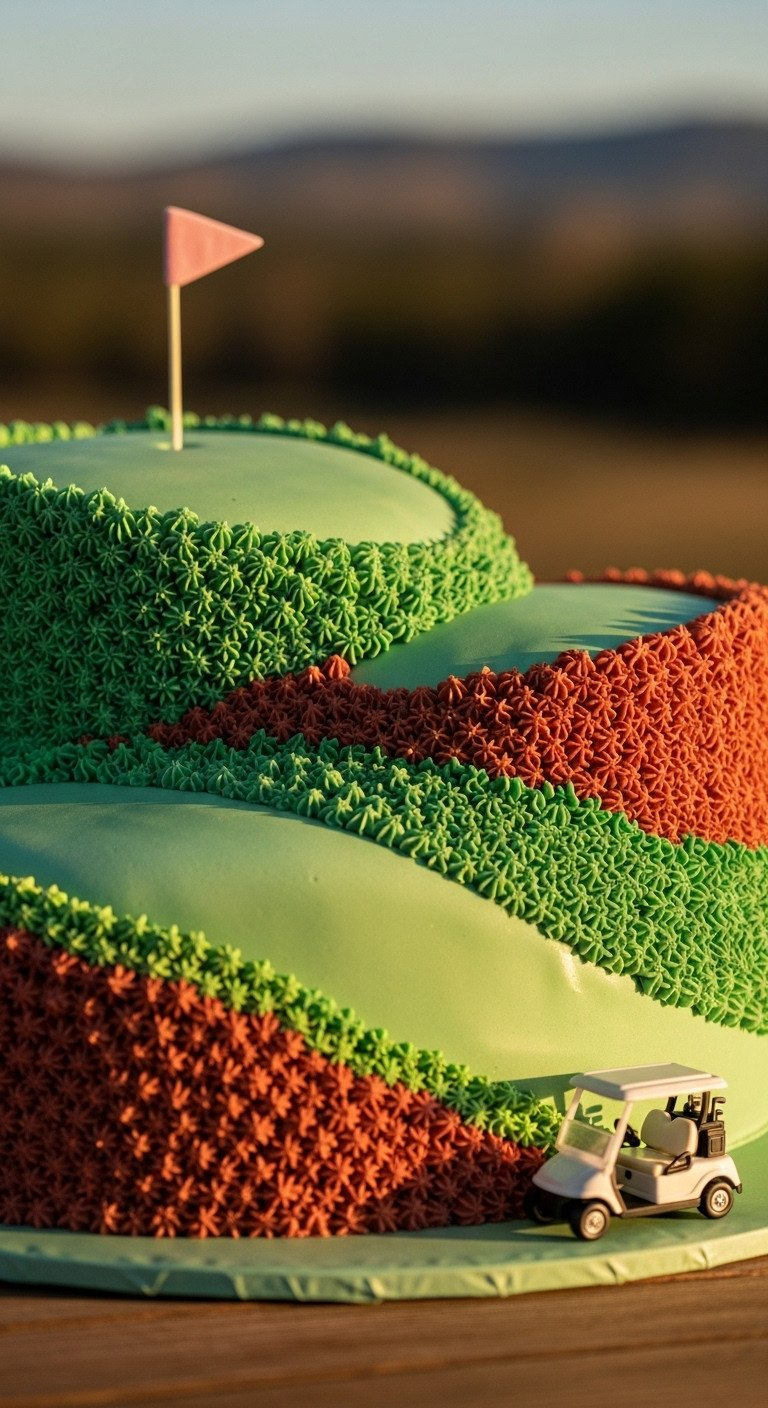
Pin this proportional carving technique for professional results!
Ready to move beyond a flat fairway? Creating subtle hills and slopes with cake carving is the next step toward a professional-looking golf course. This technique requires a steady hand and a cold cake, but the 3D effect is well worth the effort.
Materials Needed:
- Two 10-inch round cake layers (fully chilled, ideally frozen for 30 min)
- Large serrated knife or professional cake leveler
- Stiff buttercream (three shades of green: light, medium, dark)
- Offset spatula
- Ruler or stencil for planning
Step-by-Step Directions:
- Plan the Terrain: Before you cut, sketch the desired contours on paper. Note where the peaks and valleys will be to prevent over-carving.
- Freeze/Chill Layers: Make sure your cake layers are very cold or slightly frozen. This ensures clean cuts with minimal crumbling.
- Carve the Mounds: Use a large serrated knife to carefully slice away cake, creating gentle slopes and rounded mounds based on your blueprint. Save the excess cake pieces.
- Secure the Structure: Apply a layer of buttercream between your carved layers. Use any excess cake pieces blended with a small amount of frosting (like a cake pop mix) to fill steep gaps or sharp angles. Crumb coat the entire structure and chill it until firm.
- Create Depth: Use color to enhance the 3D effect. Apply the darkest green buttercream to the lowest areas (the rough), the medium green to the slopes (the fairway), and the lightest green on the peaks (the putting green).
- Texture Finish: Finish the surface using the #233 grass tip or smooth it with a clean offset spatula for a manicured fairway look.
Expert Insight: Don’t throw away your cake trimmings! Mix them with a small amount of frosting to create an “edible clay.” You can press this mixture into areas where you need to build up small, secure slopes or smooth out transitions.
6. Edible Golf Ball Dimple Cake (Par-4)
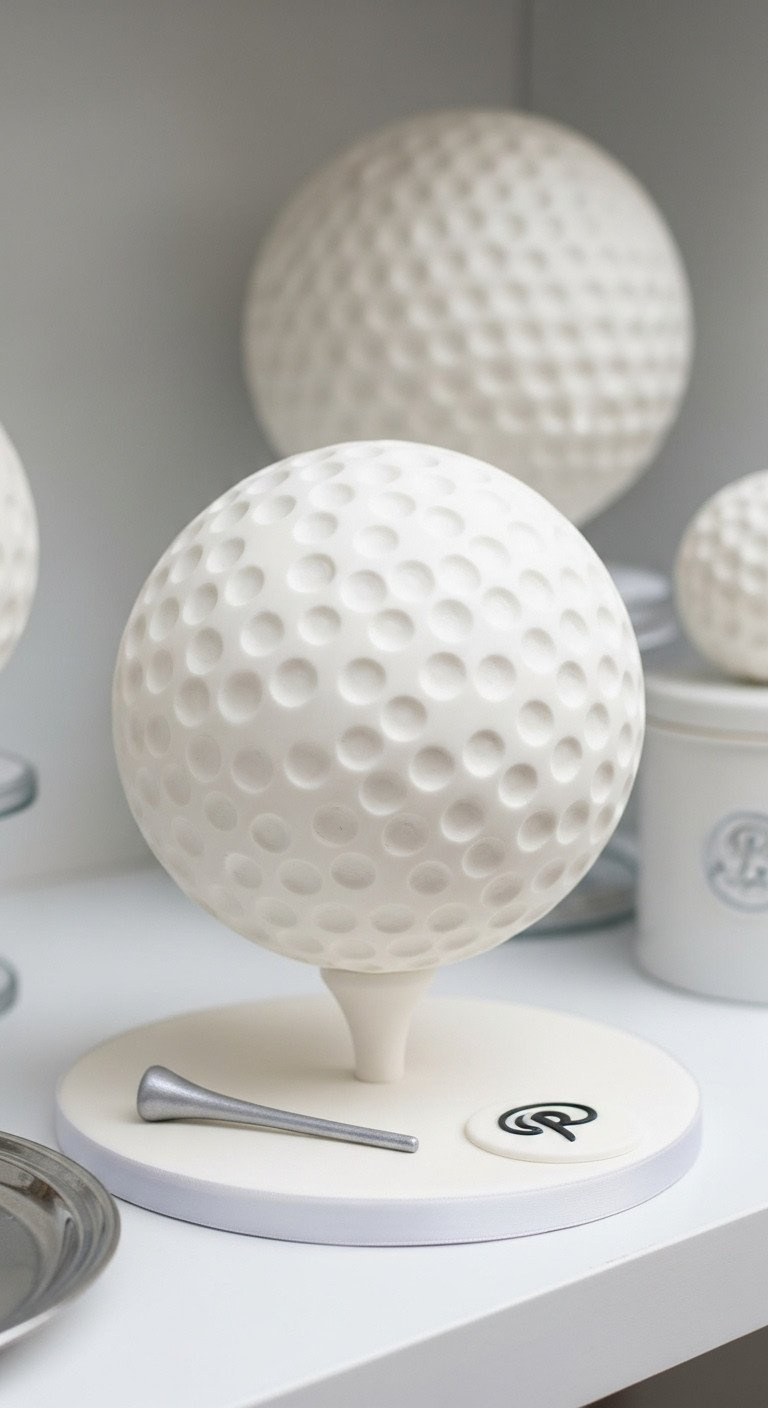
Save this tutorial to master the perfect 3D golf ball shape!
This design moves into the realm of sculpted cakes, creating a show-stopping 3D centerpiece. The challenge lies in achieving a perfect sphere and applying the signature dimple texture uniformly. Specialized hemisphere pans are the key to getting the initial shape just right.
Materials Needed:
- Cake baked in specialized hemisphere pans (two halves, chilled)
- Buttercream or ganache (for filling and coating)
- 3 lbs white fondant or modeling chocolate
- Dimple impression tool, or the base of a round piping tip
- Sharp knife for leveling
- Small dowel rod (for internal stability)
Step-by-Step Directions:
- Level and Fill: Level the flat sides of the two cake hemispheres so they fit together cleanly. Fill and stack them with a stiff buttercream or ganache, inserting a short, centered dowel rod for internal stability.
- Shape and Crumb Coat: Apply a stable layer of ganache or very stiff buttercream over the entire sphere, shaping it perfectly smooth with a bench scraper or flexible smoother. Chill the sphere until it is rock hard.
- Cover with Fondant: Roll the white fondant slightly thicker than usual to prevent tearing. Carefully drape and cover the sphere, smoothing out any creases from top to bottom.
- Create Dimples: Start at the top and work your way down. Gently but firmly press your dimple impression tool (or the round end of a piping tip) into the fondant, ensuring the pattern is uniform and covers the entire surface.
- Final Presentation: Place the finished golf ball cake on a small, round green cake board to mimic a putting green or a tee.
Lesson Learned: Use ganache (a mix of chocolate and cream) instead of buttercream for the final coating before applying fondant. Ganache sets much harder and firmer, creating a more structurally sound and perfectly smooth surface. This stable base makes it far easier to apply the golf ball dimple pattern without denting the cake.
7. The Tiered 18th Hole Course (Par-5)
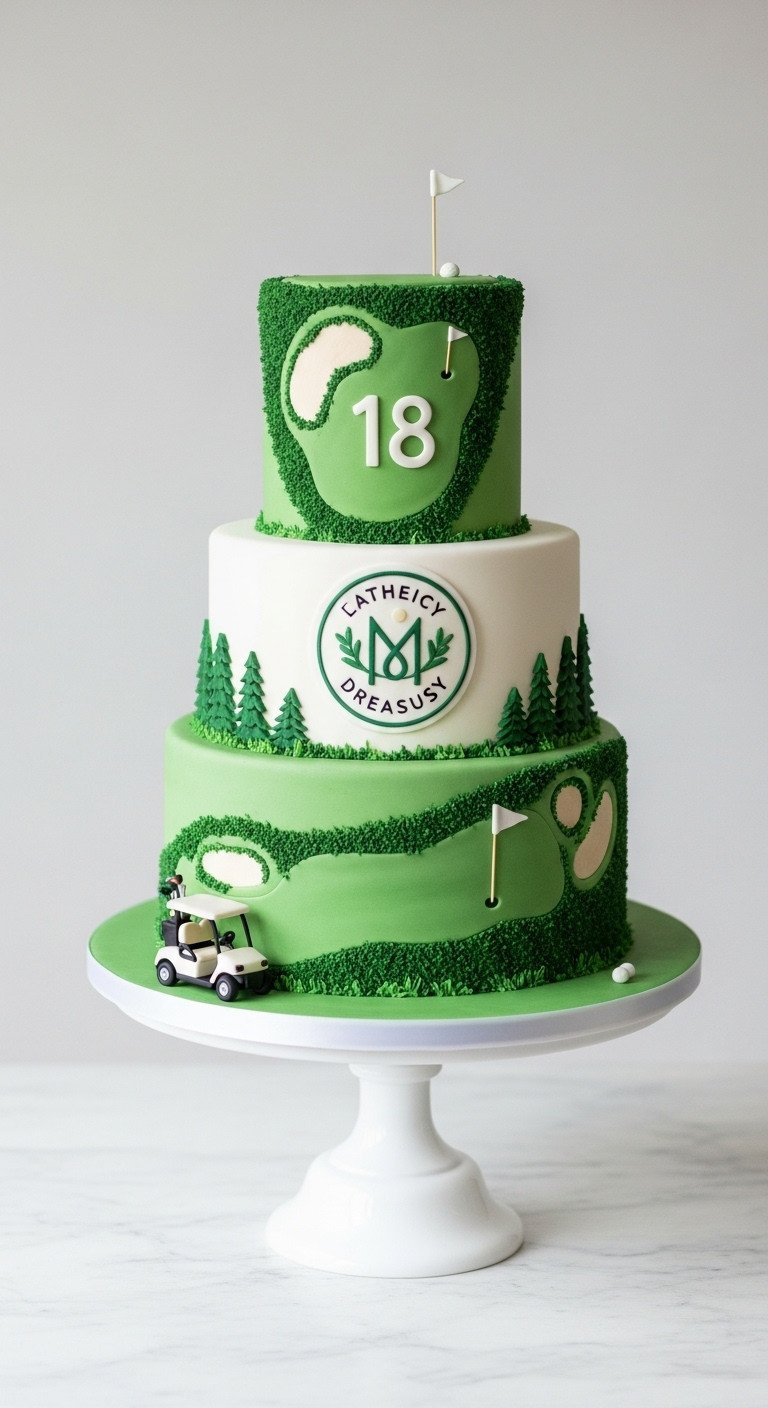
Pin this expert-level structure guide before attempting any tiered cake!
Welcome to the major leagues of cake decorating. A tiered cake is less about decoration and more about engineering. The weight of each tier must be properly supported to prevent leaning, sagging, or total collapse. Mastering the art of doweling is a non-negotiable skill for this advanced design.
Materials Needed:
- Three fully decorated cake tiers (12″, 8″, 6″)
- 14-inch heavy-duty cake drum (base board)
- Plastic or wooden dowel rods (various diameters)
- Central support rod (optional but recommended for 3+ tiers)
- Ruler and dowel cutters/shears
- Non-slip mat for transport
Step-by-Step Directions:
- Determine Dowel Placement: Measure the exact height of your bottom (12-inch) tier. Cut 4-6 dowel rods to this precise height. Insert the dowels into the bottom tier in a circle where the 8-inch tier will rest.
- Repeat for Second Tier: Place a thin cake circle under your 8-inch tier and carefully place it on top of the dowels in the bottom tier. Now, repeat the measuring and insertion process, placing 3-4 dowels into this second tier to support the final 6-inch top tier.
- Stack the Final Tier: Carefully place the top 6-inch tier (also on a cake circle) onto the dowels in the second tier.
- Optional Central Rod: For maximum safety during transport, drive a sharpened central dowel down through the center of all three tiers and into the base board.
- Final Decoration: Apply any final decorations to hide the seams between tiers, like a border of piped grass or a fondant ribbon.
- Transport Safely: Transport the fully chilled, doweled cake on a flat, non-slip surface in a cool vehicle. Never place a tiered cake on a car seat.
Expert Tip: Always use dowels that are cut perfectly flush with the height of the tier they support. If a dowel is even 1mm too short, the tier above it will settle and lean, creating immense pressure and risking a collapse.
8. 3D Sculpted Golf Bag Cake (Par-5)
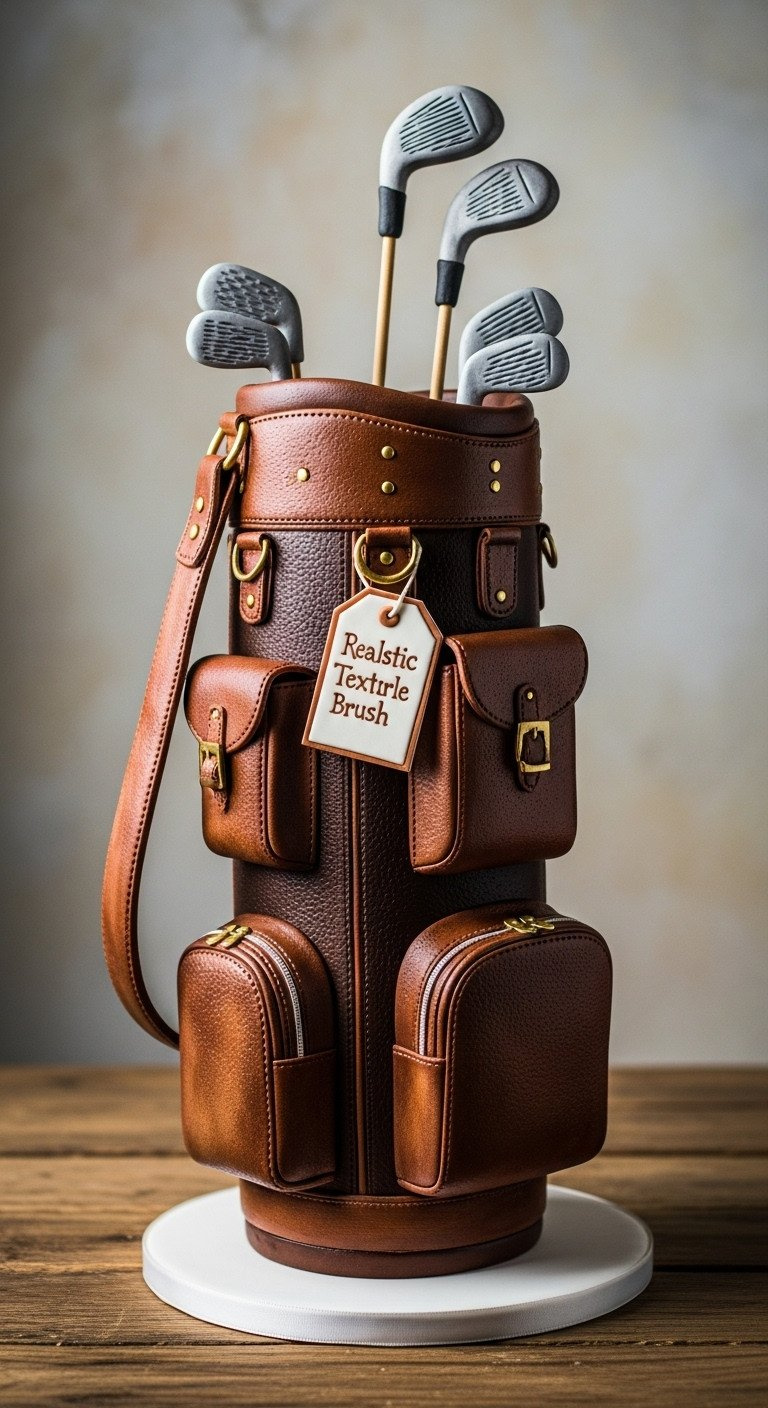
Save this advanced technique for a challenging, impressive project!
This gravity-defying sculpted cake is a true test of skill, combining cake carving with advanced materials like modeling chocolate and Rice Krispie Treats (RKT) for structure. The key is building a stable internal core before adding any decorative details.
Materials Needed:
- Stacked, carved, and chilled cake layers (for the main body)
- Rice Krispie Treats (RKT) mixture (for the top curvature/non-edible elements)
- Modeling chocolate or pliable fondant (for covering)
- Gumpaste (for thin, early-drying elements like club heads)
- Internal supports/skewers (for club placement)
- Piping gel or edible glue
Step-by-Step Directions:
- Build the Core: Secure carved cake layers onto a sturdy baseboard. Use a lightweight RKT mixture to sculpt the rounded top opening and any smaller pockets. RKT is much lighter than cake, which is critical for stability.
- Crumb Coat and Chill: Cover the entire structure (both cake and RKT) with a thin layer of ganache. Chill until hard.
- Model the Covering: Roll out the modeling chocolate and cover the structure. Use fondant tools to press in texture details like stitching or a leather grain.
- Sculpt Details: Model small pockets, straps, and buckles from excess modeling chocolate, attaching them with edible glue.
- Prepare the Clubs: The thin golf club shafts and heads must be made from gumpaste at least 48 hours in advance so they can dry completely hard.
- Assemble the Bag: Carefully insert the hardened clubs into the top RKT portion of the cake and add any final details, like a personalized edible tag.
Expert Tip: Use modeling chocolate over fondant for 3D sculpting. It is more pliable, has a longer working time, is less likely to tear on sharp corners, and makes it much easier to blend seams when covering complex shapes.
9. The Reflective Water Hazard Cake (Par-5)
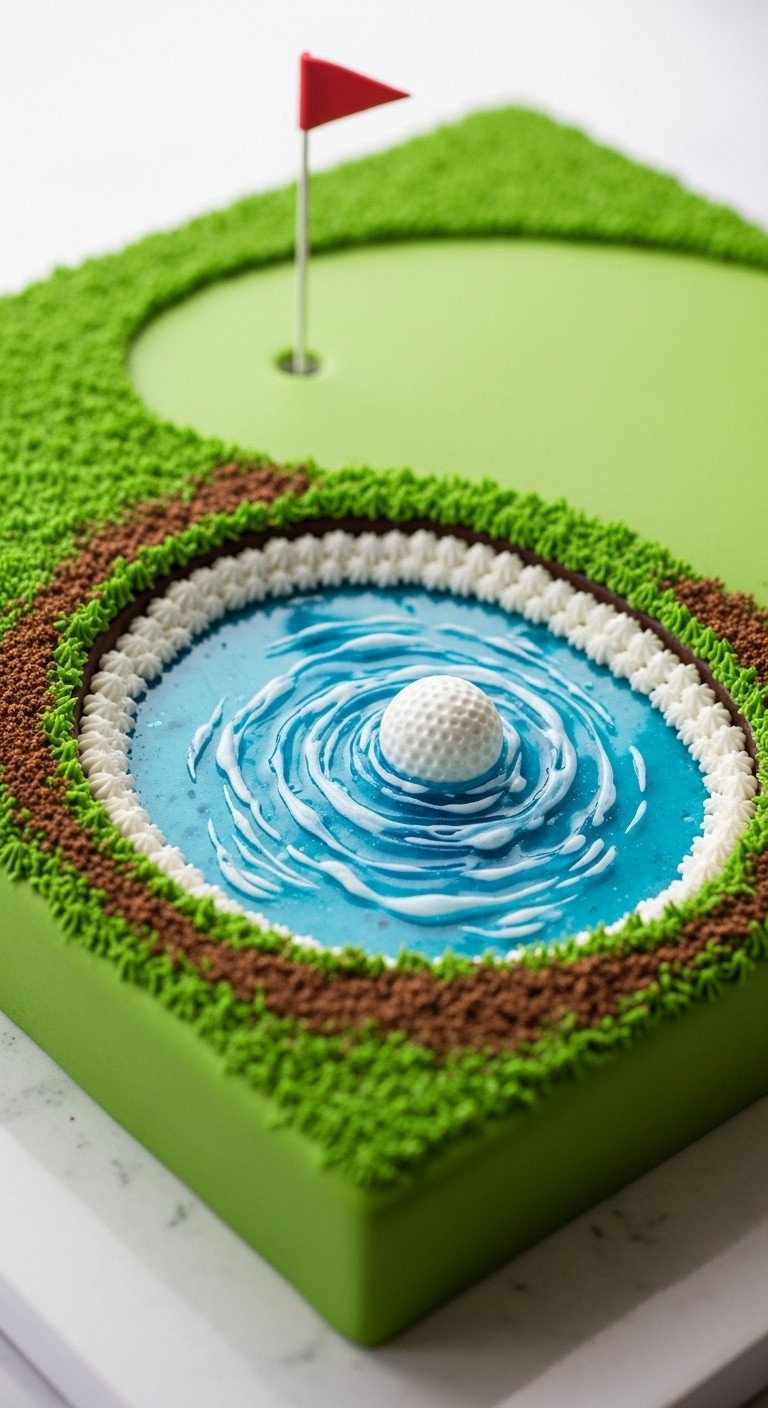
Save this emerging technique for a truly unique course feature!
Creating an edible water hazard that looks reflective and liquid is an advanced confectionery effect that will leave everyone speechless. This technique relies on specialized materials like clear piping gel or isomalt and requires careful preparation to contain the “water.”
Materials Needed:
- Cake covered in base frosting/fondant
- 1 jar clear piping gel (or isomalt granules for a glass-like effect)
- Royal blue gel food coloring
- Small offset spatula
- Edible silver luster dust (optional, for shimmer)
Step-by-Step Directions:
- Recess the Water Area: Before frosting the cake, carve out a shallow depression where the water hazard will be. This step is crucial to create a basin that will contain the gel.
- Seal the Edges: Cover the entire cake, including the inside of the depression, with fondant or a firm, crusted buttercream. This creates a waterproof barrier and prevents the blue gel from soaking into the cake.
- Prepare the Gel: Tint the clear piping gel with a very small amount of royal blue coloring. For a beautiful shimmer, stir in a tiny pinch of edible silver luster dust.
- Fill the Hazard: Carefully pour or spoon the prepared blue piping gel into the recessed area. Use a small offset spatula to smooth the surface and gently push the gel up to the defined ‘shoreline.’
- Create Waves (Optional): Once the gel has settled, you can use the tip of a toothpick to gently etch small, subtle wave patterns into the surface for added texture.
- Add Details: Complete the scene by placing a half-submerged edible golf ball or small gumpaste rocks near the water’s edge.
Pro-Tip: If using heated isomalt for a true glass-like effect, always protect the cake surface. Place a thin, rigid layer of hardened chocolate or a fondant disc inside the depression before pouring. Hot isomalt can easily melt the base frosting or plastic supports.
Structural Integrity & Troubleshooting: Mastering Doweling and Transport
Even the most beautifully decorated cake can be ruined by structural failure. The three most common golf cake mistakes are a bitter green frosting, a leaning tiered cake, and cracked fondant. Here’s how to solve them like a pro.
Problem 1: The green frosting tastes bitter. This happens from using too much liquid food coloring.
* Solution: Always use concentrated gel food coloring. To achieve a deep, realistic fairway green, start with your green gel and add a tiny drop of brown or red dye to neutralize the artificial brightness and deepen the color without adding a chemical taste.
Problem 2: The tiered cake leans or collapses. This is almost always due to improper support. A cake’s weight, especially with heavy fondant and decorations, needs an internal skeleton.
* Solution: Use accurately measured, load-bearing dowels. For every tier that will have another cake placed on top of it, you must insert several dowel rods cut to the exact height of that tier. This transfers the weight down to the cake board, not onto the soft cake below.
Problem 3: The fondant tears or cracks. Buttercream is a soft, unstable base for heavy fondant.
* Solution: Cover the cake in a firm layer of chocolate ganache before applying the fondant. Ganache sets hard, providing a perfectly smooth, rigid surface that prevents the fondant from shifting, bulging, or tearing.
Key Takeaways: Your Quick Guide to Golf Cake Success
Before you head to the kitchen, keep these five crucial tips in mind. This checklist will help you navigate your project, whether it’s a simple sheet cake or a complex 3D masterpiece.
- Par-3 Focus: For beginners, mastering the #233 piping tip for realistic grass is the single most impactful skill. Remember that stiff, cool buttercream is your best friend.
- Sand Trap Secret: The most realistic edible sand is made from finely crushed vanilla wafers or graham crackers. Always secure the crumbs with a layer of clear piping gel to prevent them from falling off.
- Color Control: Prevent bitter green frosting by using concentrated gel colors. Adding a tiny dot of brown or red dye will neutralize the artificial brightness and create a more natural, earthy tone.
- Par-5 Structure: Never attempt a cake with more than two layers or heavy 3D decorations without structural support. Use precisely cut dowel rods to transfer weight and ensure stability.
- Advanced Details: For 3D elements like golf clubs, carts, or player figures, use gumpaste or modeling chocolate. Make these pieces several days in advance so they have time to dry completely hard.
People Also Ask About Golf Themed Cakes
How far in advance can I make a golf themed cake?
You can prepare components well in advance to reduce day-of stress. Bake and freeze cake layers up to one month ahead. Non-perishable decorations, such as gumpaste figures or fondant details, should be made and dried 3–5 days prior. Final assembly and applying buttercream should occur 1–2 days before the event for optimal freshness and structural integrity.
What kind of frosting is best for piping realistic grass?
A stiff, crusting American Buttercream or a stabilized Swiss Meringue Buttercream is essential. The structural stability is key for the Wilton #233 grass tip to hold its shape without drooping. Ensure the frosting is cool and firm (consider adding high-ratio shortening) before piping to achieve that realistic, shaggy texture.
How much does a custom golf themed birthday cake usually cost?
A custom golf themed cake typically costs 2.5 to 4 times the price of a standard tiered cake. This is due to the high level of detail, specialized materials like gumpaste, and the significant time required for 3D sculpting and modeling. Prices vary widely, but expect quotes from professional bakeries to start in the $150–$250 range for a detailed single-tier cake.
What is the best way to transport a complex tiered golf cake safely?
Secure the cake with internal doweling and transport it on a non-slip mat. Ensure the base is a heavy-duty cake drum, and chill the cake until it’s firm before the move. Transport it in a secure, flat area (like the car floor or trunk) in an air-conditioned vehicle to prevent melting and shifting.
Final Thoughts
Whether you chose a Par-3 simple sheet cake or conquered the Par-5 3D challenge, remember that your golf themed cake is a unique centerpiece made with care. Success lies in planning your design using the Par-3 to Par-5 framework and mastering a few core techniques like piping grass and ensuring stability. The real hole-in-one is seeing the recipient’s delighted reaction to this personalized tribute.
Which of these nine techniques will you try first for your next celebration? Let us know in the comments below
Last update on 2026-01-16 / Affiliate links / Images from Amazon Product Advertising API

