As an Amazon Associate GolferHive.com earns from qualifying purchases.
Ultimate Golf Photoshoot Ideas Poses and Pro Techniques
Struggling to capture golf photos that look truly professional? Your shots might have the right subject, but they feel flat, lacking that magazine-quality pop you see online. You know the potential is there on the beautiful course, but translating it into a stunning image is the real challenge.
A Golf Photoshoot is a specialized art form that combines sports action, portraiture, and landscape photography. You’re not just taking snapshots; you’re telling a story about the athlete, the action, and the environment. It requires a unique blend of technical skill and creative vision to overcome fast motion and tricky outdoor lighting.
The three essentials for high-quality golf photos are mastering light, composition, and shutter speed. This guide will provide you with a catalog of proven ideas and the exact pro techniques to master all three. You’ll learn how to transform your images from simple documentation into powerful visual content.
Moving Beyond Snapshots: Why Your Golf Photos Feel Flat
Have you ever looked at your golf pictures and felt they just don’t capture the energy and elegance of the game? You’re not alone. Golf photography presents a unique set of challenges that can frustrate even seasoned photographers. The fast, explosive action of a golf swing demands technical precision, while the vast, open spaces of a golf course often come with harsh, unpredictable lighting. Many amateur golf photography attempts fall flat because they fail to control these two critical variables.
The difference between a simple snapshot and a professional golf photo lies in the photographer’s ability to command the technical settings of their camera while applying timeless principles of composition. It’s about more than just pointing and shooting; it’s about understanding how to freeze motion, sculpt with light, and use the course itself as a dynamic background. All the techniques shared in this guide are derived from professional sports photography principles, adapted specifically for the dynamic golf environment, to give you the blueprint for creating truly compelling visual content.
The Ultimate Golf Photoshoot Idea Catalog: 11 Shots to Master in 2026
Ready for some inspiration? This isn’t just a list of generic poses; it’s a curated checklist of 11 high-impact shots that cover action, portraiture, lifestyle, and niche photography. These ideas are tested and proven to produce magazine-quality results, especially when you pair them with the detailed technical settings we’ll cover later. Think of this as your visual shot list for your next session on the course.
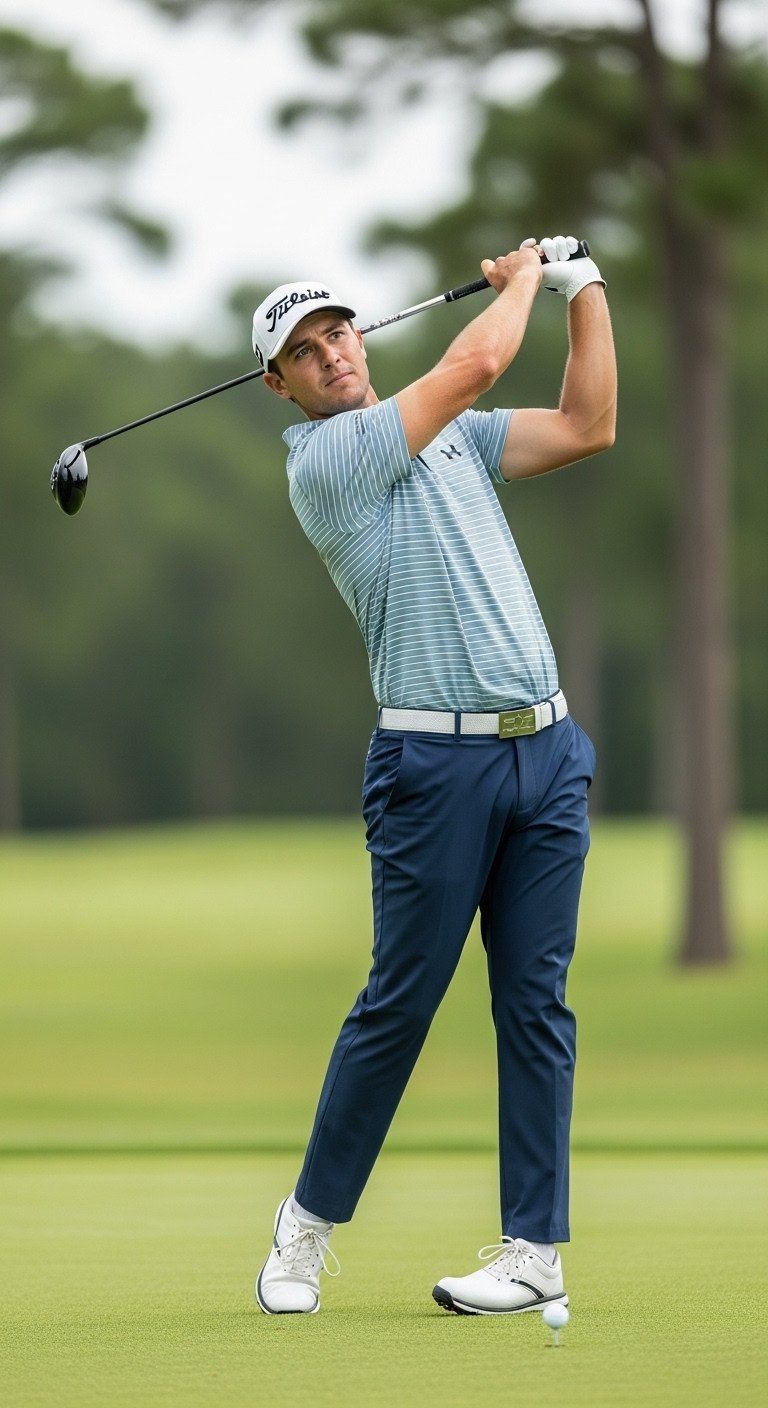
1. The Telephoto Swing Freeze (High-Speed Action)
- Pin this genius tips to your ‘Sports Photography’ board!
This shot is the cornerstone of dynamic golf photography. The goal is to capture the peak moment of the swing—the follow-through—with absolute sharpness, freezing the explosive energy against a beautifully blurred background. The telephoto compression created by a long lens makes the golfer pop from the scene, giving the action shots a professional, high-contrast feel.
Equipment & Setup:
- High-Speed Mirrorless Camera Body (e.g., capable of 15+ FPS and superior AF tracking)
- Telephoto Zoom Lens (70-200mm f/2.8 or f/4 recommended for reach and speed)
- Extra High-Speed Memory Cards (V90 minimum)
Posing & Technique Steps:
- Set Shutter Priority (Tv/S): Dial in a minimum shutter speed of 1/1250s (ideally 1/1600s or faster) for the driver.
- Engage Continuous AF (AF-C/Servo): Set the camera to track focus continuously, using a single point or a small group of points centered on the golfer’s chest.
- Anticipate the Peak: Ask the golfer to practice their swing. Begin shooting a fraction of a second before the club reaches its apex or follow-through.
- Shoot in High-Speed Burst: Hold down the shutter button through the entire action sequence to increase the chance of freezing the perfect moment.
Pro-Tip: Always use back-button focus for action shots; it separates focus from the shutter, allowing you to maintain AF lock while shooting bursts.
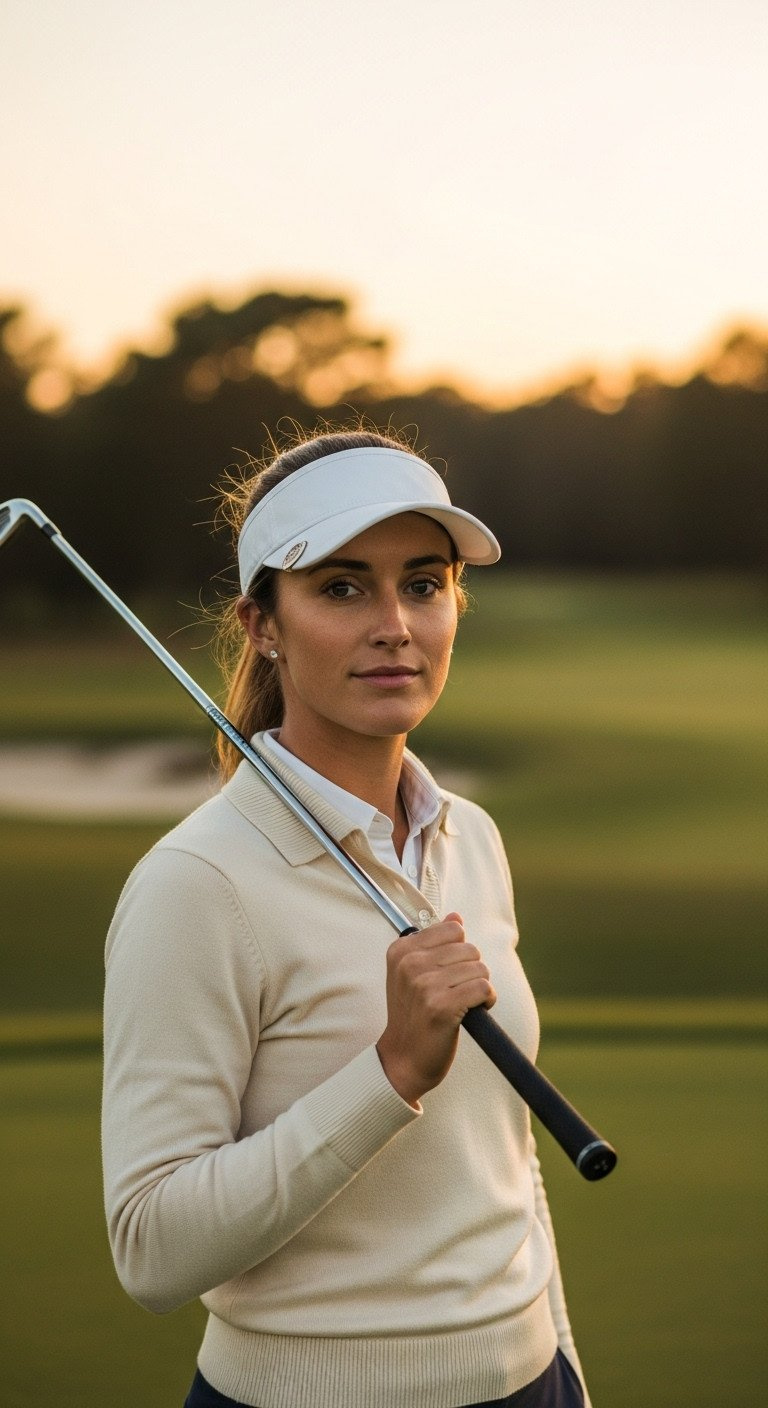
2. The Golden Hour Portrait (Shallow Depth of Field)
- Save this clever organization idea!
This is the classic, flattering portrait that every golfer wants. By shooting during the golden hour (just after sunrise or before sunset), you get soft, warm, directional light that is incredibly flattering. Paired with a wide aperture (a low f-number), this timing creates a shallow depth of field, rendering the background into a soft, creamy bokeh that makes the portrait feel high-end and isolated.
Equipment & Setup:
- Fast Prime Lens (85mm or 135mm recommended for maximum bokeh and sharpness)
- Tripod or Monopod (optional, for stability in low light)
- Lightweight Reflector (gold side for warming the skin tone)
Posing & Technique Steps:
- Scout for Background Depth: Find a location where the golfer can stand 20+ feet away from the background elements (trees, buildings) to maximize separation.
- Set Aperture Priority (Av/A): Select the widest possible aperture (f/1.4 to f/2.8) to create the soft, blurry bokeh effect.
- Position Subject: Place the golfer so the sun is hitting them slightly from behind or side-back (creating rim light) and use the reflector to bounce light onto the face.
- Direct Soft Poses: Ask the golfer to interact naturally with their club (leaning, looking down the fairway, resting on a knee) to ensure a relaxed expression.
Pro-Tip: Shooting slightly uphill or downhill minimizes distracting elements in the background, allowing the beautiful bokeh to dominate the scene.
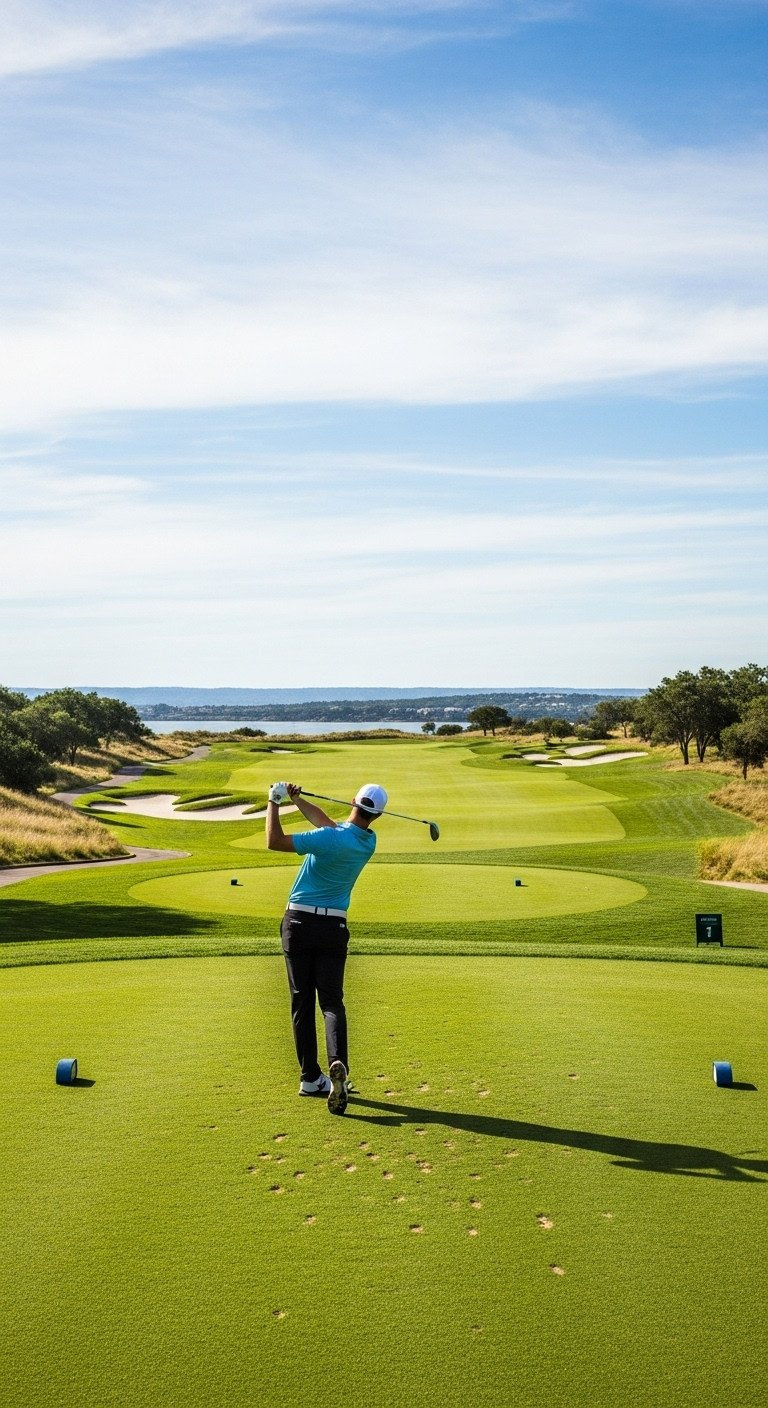
3. Environmental Tee Box Setup (Scale and Leading Lines)
- Download our free Composition Checklist!
This shot focuses on composition, using the golf course itself as a key subject. By using a wide-angle lens, you can capture the immense scale and architectural beauty of the fairway and tee box. The key is to find and use leading lines—the edge of a bunker, the curve of a cart path, or the treeline—to guide the viewer’s eye through the frame directly to the golfer, creating a sense of depth and context.
Equipment & Setup:
- Wide-Angle Lens (16mm to 35mm recommended for maximum context)
- Leveling Tool (to ensure the horizon remains straight)
- Large Sensor Camera (to handle the vast dynamic range)
Posing & Technique Steps:
- Set Deep Focus: Use Aperture Priority (Av/A) and set a narrow aperture (f/8 to f/11) to ensure the foreground (tee box) and the background (distant fairway) are both sharp.
- Identify Leading Lines: Position the camera so that the natural lines of the course—the edge of the tee box, the cart path, or the fairway curve—lead directly to the golfer.
- Position the Golfer: Place the golfer at one of the intersections of the Rule of Thirds grid (not dead center) to create visual interest and scale.
- Use a Low Perspective: Get low to the ground near the tee markers to emphasize the vastness of the course and the size of the landscape.
Pro-Tip: Wait for a cloud to pass overhead to soften the light. If shooting architectural, use a polarizing filter to enhance sky saturation and reduce glare on the green.
4. Detail Shot: The Texture of the Green (Macro Focus)

- Pin for incredible texture inspiration!
A complete golf photoshoot tells a story, and details are a crucial part of that narrative. This artistic macro shot focuses on the intricate textures of the game: the dimples of the golf ball, the dew on the green, or the milled face of a wedge. Using a macro lens allows you to magnify these small details, creating compelling, abstract images that add a layer of sophistication to the final gallery.
Equipment & Setup:
- Macro Lens (100mm or 105mm for high magnification) or Extension Tubes
- Small Tripod (essential for precise focusing in macro distances)
- Small LED Light (for subtle fill or highlighting texture)
Posing & Technique Steps:
- Stabilize and Focus: Mount the camera on a tripod. Switch to Manual Focus and use “Focus Peaking” or Magnification Assist on the camera screen for critical focus.
- Use Mid-Range Aperture: Select an aperture between f/4 and f/8. Macro shots have extremely shallow depth of field; wider than f/4 may make too much of the subject blurry.
- Control the Lighting: Use the small LED light or reflector to create a subtle side light that emphasizes the texture of the grass and the dimples on the ball.
- Clean the Subject: Ensure the golf ball and club head are spotless; dust, smudges, or scratches are highly visible in macro shots.
Pro-Tip: Focus stacking (taking multiple shots at different focus depths and blending them in editing software) is often required for critical sharpness across an entire detail shot.
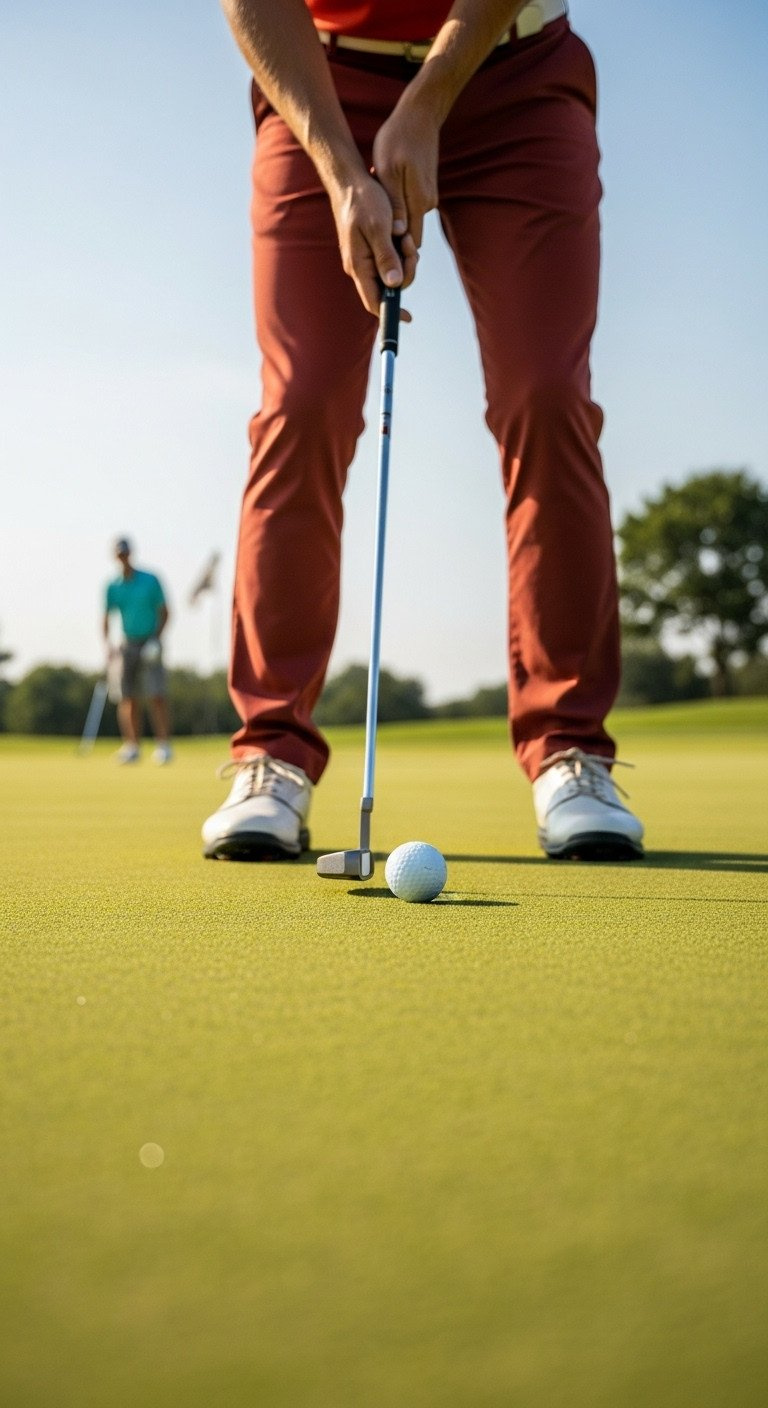
5. Dramatic Low-Angle Putt (Perspective Shift)
- Master perspective with this shot idea!
To avoid cliché golf poses, change your perspective. A dramatic low-angle shot, taken from ground level on the putting green, creates a powerful “worm’s eye view.” This perspective makes the golfer appear heroic and larger-than-life, emphasizing their concentration and focus. The green itself becomes a strong foreground element, adding texture and depth to what would otherwise be a standard putting pose.
Equipment & Setup:
- Camera Body with Articulating Screen (essential for ground-level shooting comfort)
- Portable Tripod or Bean Bag (to stabilize the camera directly on the ground)
- Shutter Remote Release (to minimize camera shake at ground level)
Posing & Technique Steps:
- Find a Clear Line of Sight: Position the camera directly behind the ball and the putter, aiming up at the golfer’s hands and face as they line up the shot.
- Use the Green as Foreground: Ensure the texture of the grass is prominent in the foreground to give immediate depth to the image.
- Set a Moderate Shutter Speed: Since putting is slower, you can drop the shutter speed to 1/800s or 1/500s, but still fast enough to capture the contact moment clearly.
- Shoot the Concentration: Focus on the moments of stillness and intense concentration just before the stroke. Capturing the slight tilt of the head or the tension in the grip adds drama.
Pro-Tip: Use the Wi-Fi or Bluetooth feature on your camera to trigger the shutter from a remote device (phone or tablet) while the camera is placed directly on the green.
6. The Rim-Lit Post-Shot Reaction (Candid Emotion)
- Capture the emotion—save this idea!
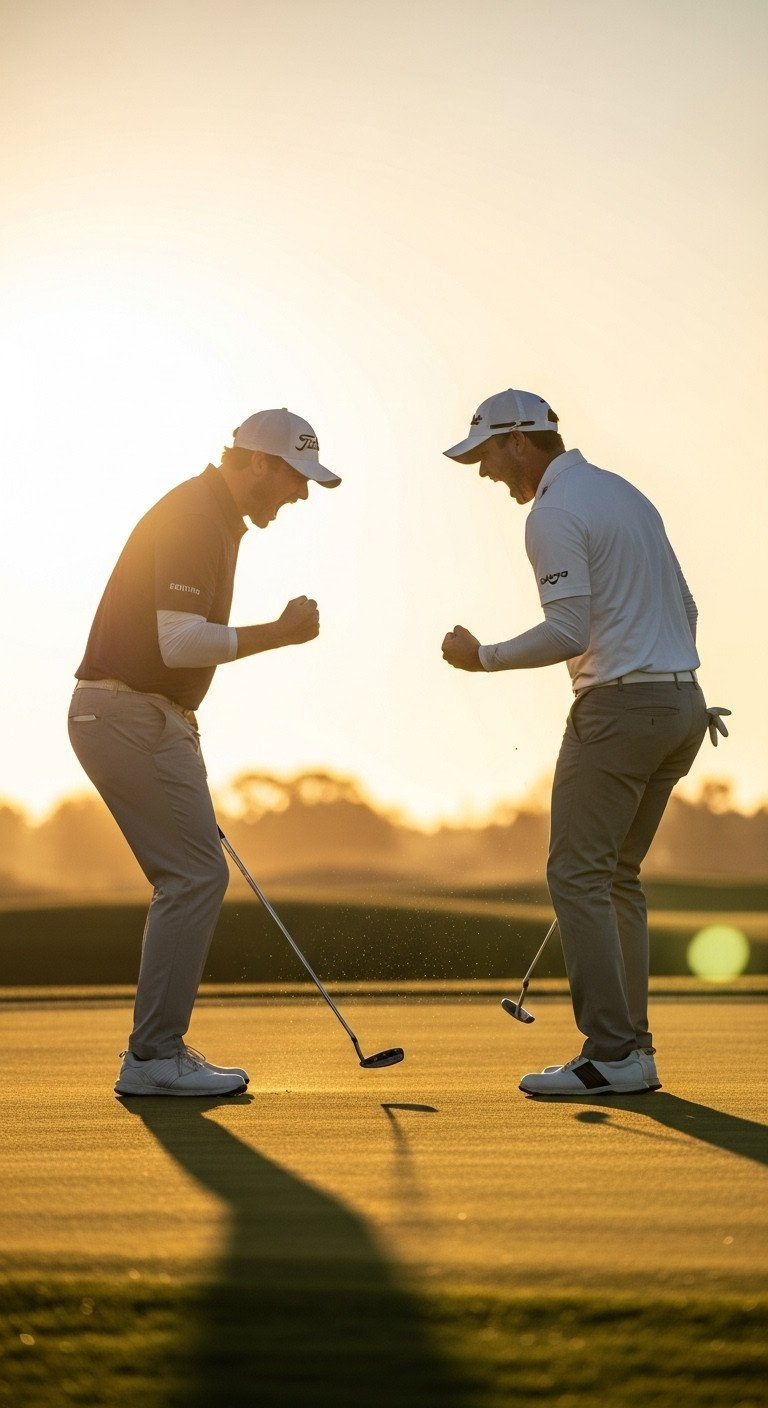
The best golf photography captures the emotional connection to the game. This shot is all about candid, genuine reactions: the triumphant fist pump after a perfect drive, the quiet focus while reading a putt, or the shared laugh with a partner. By positioning the golfer with the sun behind them (backlighting), you create a powerful rim light that separates them from the background and highlights their silhouette, adding a layer of drama to the authentic emotion.
Equipment & Setup:
- Telephoto Lens (to stay at a distance and capture candid shots without disturbing the golfer)
- Large 5-in-1 Reflector (with white or silver surface, for optional front fill if needed)
- Fast Prime Lens (for superior low-light performance)
Posing & Technique Steps:
- Position for Backlight: Ensure the primary light source (low sun) is directly behind the golfer. This automatically creates a powerful rim light separating the subject from the background.
- Anticipate Emotion: Do not ask the golfer to pose. Instruct them to play naturally, but ask them to exaggerate their real reactions after a good (or bad) shot.
- Expose for the Highlights: When backlighting, meter for the brightest part of the scene (the rim light) or manually underexpose by 1/3 stop to ensure the rim light truly pops and shadows are deep.
- Shoot Wide and Tight: Capture both the wide shot (showing the context of the course) and the tight shot (focused on the face/fist pump) in sequence for variety.
Pro-Tip: To lift the facial shadows while maintaining the dramatic rim light, use the white side of a large reflector held subtly in front of the subject, just out of the frame.
7. High-Speed Sync Midday Portrait (Overpowering the Sun)
- Solve harsh shadows—pin this HSS tutorial!
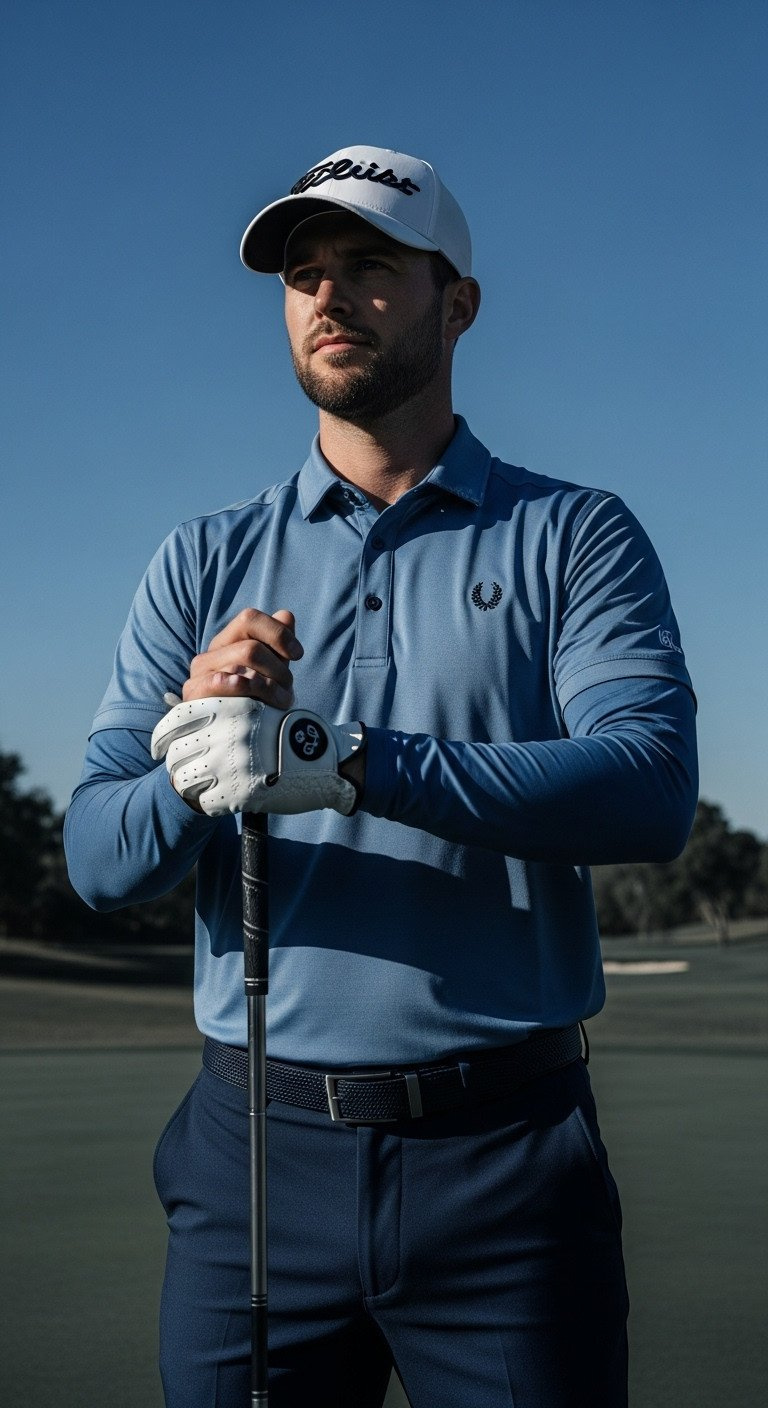
Midday sun is the enemy of portrait photographers, creating harsh shadows and squinting subjects. This advanced technique allows you to “overpower the sun” using an off-camera flash (OCF) in High-Speed Sync (HSS) mode. By underexposing the ambient light, you can create a dark, dramatic, and richly saturated blue sky, then use the flash to perfectly illuminate the golfer, resulting in a stunning, magazine-style portrait even in the worst lighting conditions.
Equipment & Setup:
- Powerful Off-Camera Flash (OCF) Unit (200Ws or stronger)
- Wireless Flash Trigger capable of High-Speed Sync (HSS)
- Small Softbox or Umbrella (for diffusing the OCF light source)
Posing & Technique Steps:
- Set the Ambient Exposure: Set your camera to Manual mode. Underexpose the ambient light by 1-2 stops (e.g., Shutter Speed 1/2000s, ISO 100, Aperture f/8). This darkens the background and saturates the sky.
- Engage HSS: Ensure both the flash and the trigger are set to High-Speed Sync mode, allowing the flash to fire at high shutter speeds.
- Position the Flash: Place the OCF unit slightly off-camera (about 45 degrees to the side and slightly above the golfer) and adjust the power until the golfer is perfectly exposed.
- Flattering Poses: Use strong, confident poses (club over shoulder, hands on hips) that complement the high-impact lighting style.
Lesson Learned: When using OCF, always shoot in Manual Mode. This allows you to control the exposure of the background (ambient light) independently from the exposure of the subject (flash light).
8. Course Architecture Drone Shot (Scale and Symmetry)
- Pin the best vantage point for course scouting!
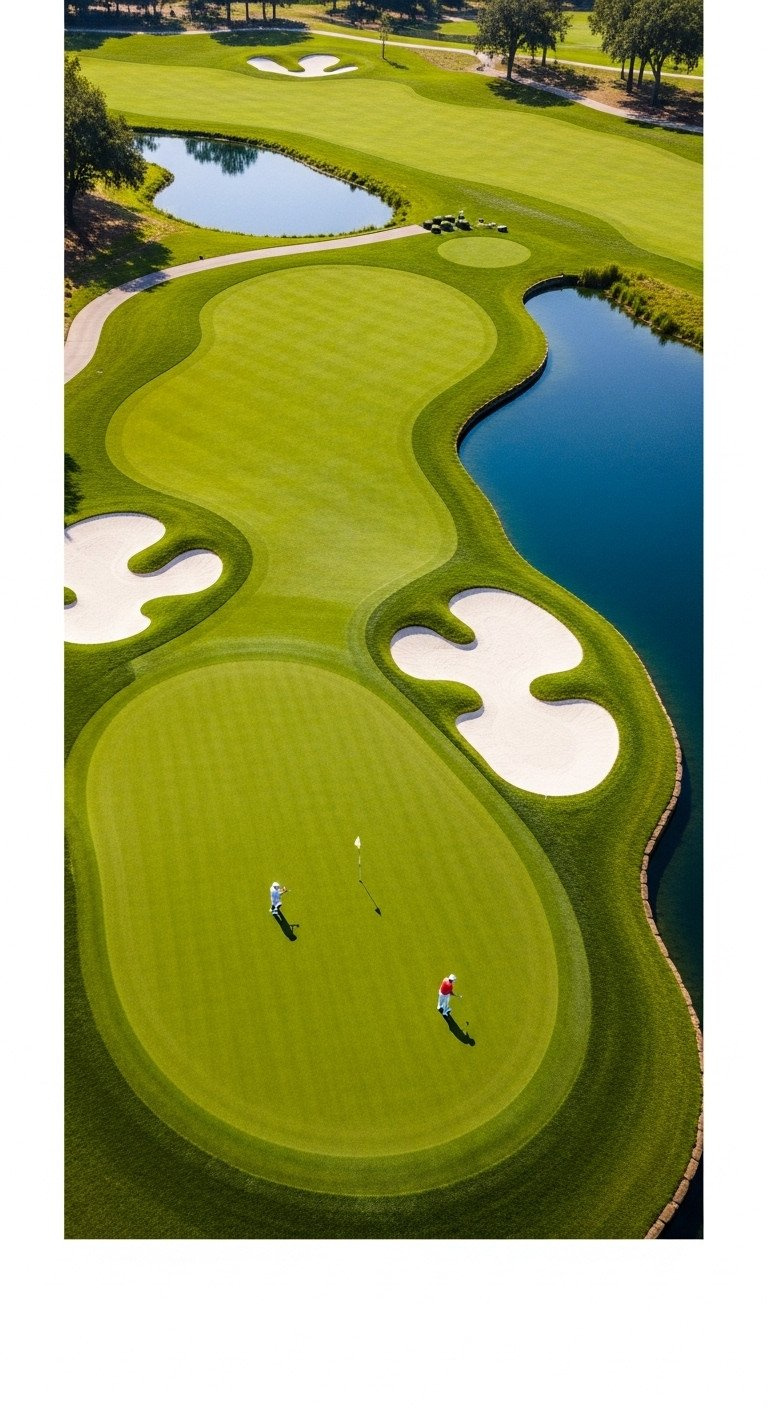
Sometimes the course itself is the star. Drone photography has revolutionized how we see golf course architecture, allowing for breathtaking aerial views that showcase the scale, symmetry, and design of the landscape. A top-down shot of a signature hole can reveal geometric patterns in bunkers and fairways that are invisible from the ground, creating a stunning piece of art.
Equipment & Setup:
- Photography Drone (capable of 4K video and RAW photo capture)
- Neutral Density (ND) Filters for Drone Camera (essential for maintaining video and photo quality in bright light)
- Course Permission and Local Aviation Compliance Documentation
Posing & Technique Steps:
- Obtain Permissions: CRITICAL: Always secure explicit written permission from the golf club management and verify local airspace regulations before launching any drone.
- Plan the Flight Path: Use the drone app to pre-plan a path that follows the lines of the fairway or highlights key features like bunkers, lakes, or bridges.
- Shoot during Golden Hour: Drone footage/photos benefit massively from soft, directional light. Early morning is preferred to capture dew and long shadows.
- Utilize Symmetry and Lines: Fly directly above the center of the fairway, using a top-down view to emphasize the architect’s geometric design and sweeping curves.
Pro-Tip: When editing drone images, use a slight ‘dehaze’ filter in Lightroom to cut through any atmospheric fog or distant haze, making the distant features sharp.
9. Couples Golf Cart Lifestyle Shot (Fun and Candid)
- Save for your next couples shoot inspiration!
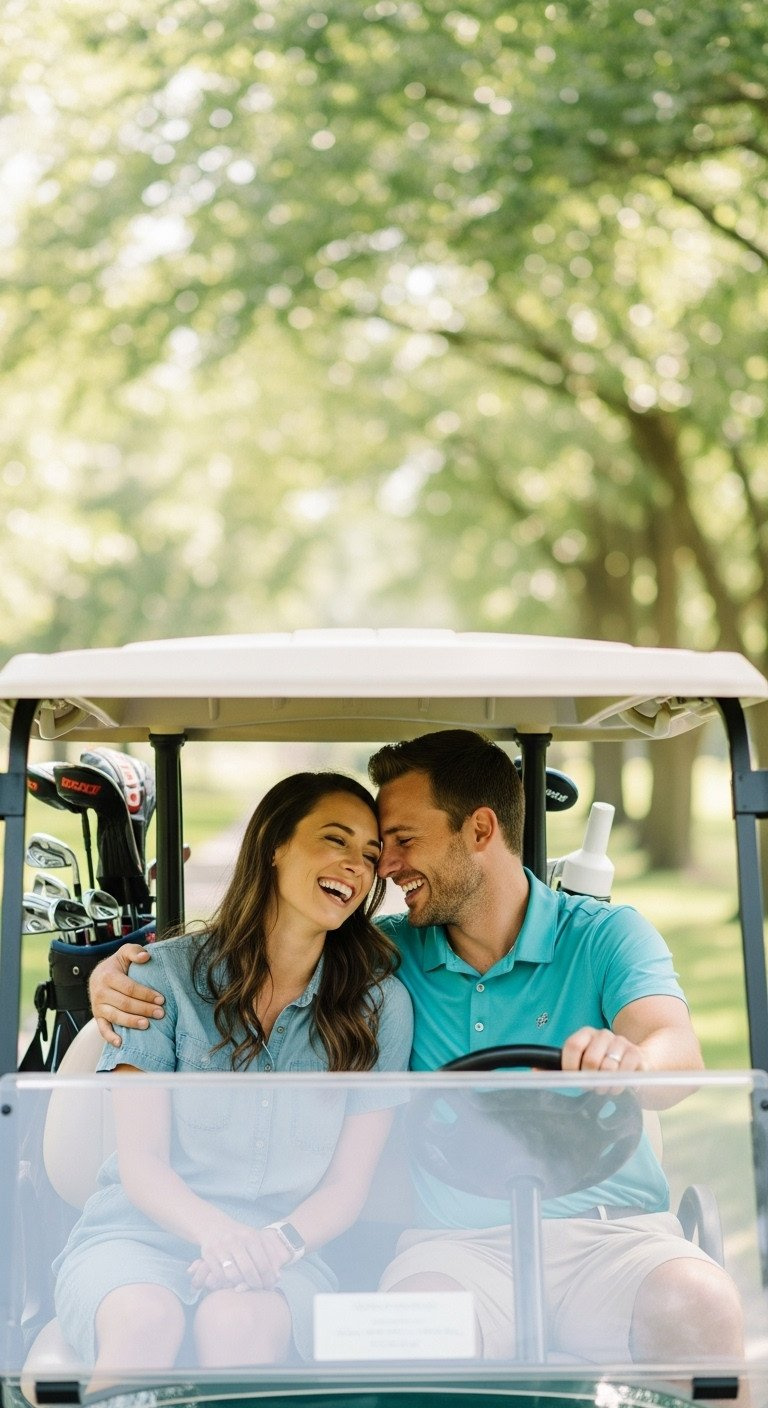
A golf photoshoot isn’t just for solo athletes. It’s a fantastic setting for fun, relaxed, and candid lifestyle shots for couples or families. The golf cart is the perfect prop to encourage natural interaction and laughter. The goal is to move beyond stiff, staged poses and capture the genuine connection and enjoyment of a shared experience on the course.
Equipment & Setup:
- Camera Bag/Backpack (rugged and weather-resistant for safely transporting gear)
- Standard Zoom Lens (24-70mm f/2.8 for versatility and moderate background blur)
- Hand Strap/Wrist Tether (essential for security while shooting from a moving cart)
Posing & Technique Steps:
- Encourage Interaction: Instead of stiff poses, instruct the couple to talk, share a joke, or look at something distant together. The goal is candid emotion, not stiff staging.
- Position the Light: If possible, shoot under the soft, open shade of a tree canopy or with the sun low and behind the cart to avoid harsh shadows on faces.
- Utilize the Cart: Use the cart itself as a natural frame or prop. Have one partner steer while the other leans in, or have them sit backward facing the fairway.
- Shoot During Movement: Capture a short burst of shots while the cart is slowly moving (5-10 mph). The slight movement will naturally blur the immediate background slightly, adding dynamism.
Pro-Tip: Ensure the golf bags or clubs are clean and positioned artfully in the background of the cart to give context without cluttering the scene.
10. The Abstract Motion Blur (Artistic Flow)
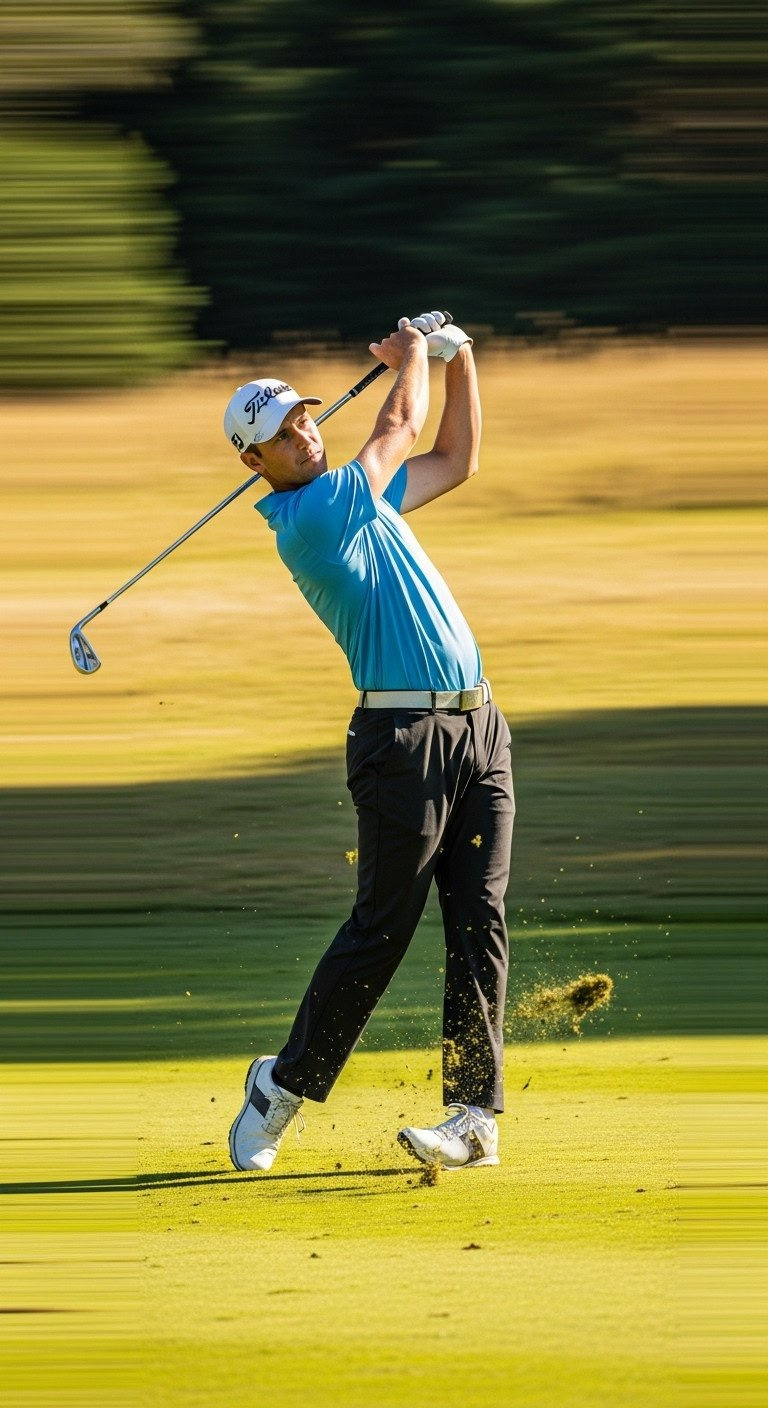
- Elevate your art—save this motion technique!
While freezing action is the standard, intentionally creating motion blur can produce a stunningly artistic and abstract image. By using a slow shutter speed, you can capture the flow and speed of the golf swing as a graceful arc of motion, contrasting it against the relatively still body of the golfer. This conceptual technique provides a stylistic alternative that conveys the feeling of movement rather than just documenting it.
Equipment & Setup:
- Neutral Density (ND) Filter (Variable ND recommended for flexible exposure control)
- Sturdy Tripod (absolute necessity for stabilizing the camera body)
- Shutter Release Cable (to prevent camera movement)
Posing & Technique Steps:
- Stabilize: Mount the camera on a rock-solid tripod. Even slight movement will ruin the effect.
- Dial in Slow Shutter Speed: Switch to Shutter Priority (Tv/S) and aim for speeds between 1/15s and 1/60s. Use the ND filter to reduce incoming light and allow for these slow speeds in daylight.
- Direct Movement: Ask the golfer to perform a smooth, slow, and consistent swing. The longer the exposure, the more abstract the resulting blur will be.
- Maintain Fixed Focus: Use single-point Autofocus to lock focus on a stationary point on the golfer (like their belt buckle or front foot) before they start the swing.
Lesson Learned: Panning (moving the camera with the golfer) is an advanced alternative, creating a blurred background while keeping the golfer relatively sharp. If attempting this, use a slower speed (1/60s) and track the subject precisely.
11. Senior Portrait with Equipment (The Legacy Shot)
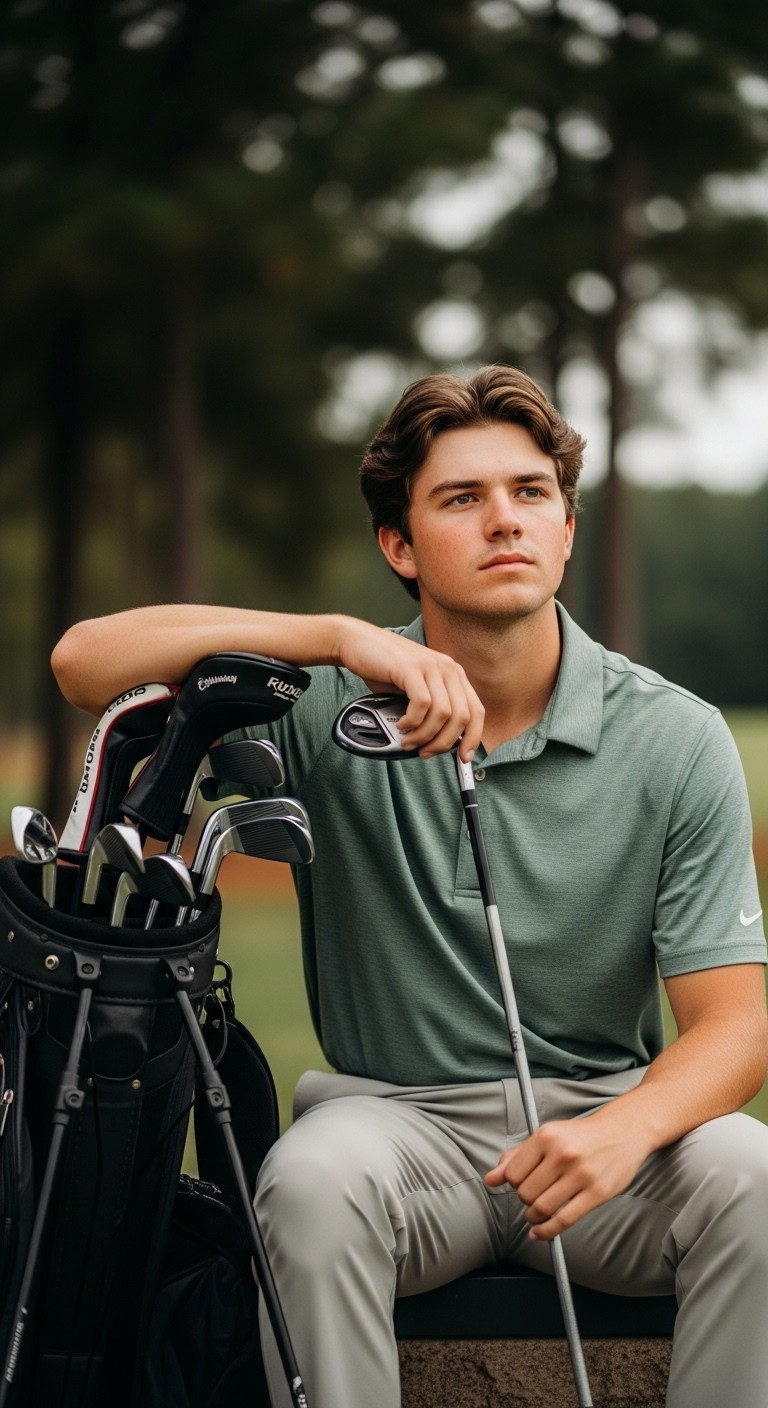
- The perfect senior portrait idea!
For a high school senior, their sport is often a huge part of their identity. A senior golf photoshoot should be a meaningful and personalized experience that celebrates their achievement and legacy. This portrait idea incorporates the senior’s equipment—their bag, their favorite club, their team apparel—as an integral part of the scene, creating a thoughtful, relaxed, and powerful image.
Equipment & Setup:
- High-Quality Prime Portrait Lens (e.g., 85mm f/1.4 or 135mm f/2)
- Simple Grey or White Reflector (for fill light)
- The Golfer’s Cleanest Equipment (clubs, bag, special trophies, or hats)
Posing & Technique Steps:
- Personalize the Scene: Ensure the specific bag, headcovers, or apparel that are meaningful to the senior are visible and clean.
- Use Natural Interaction: Instead of staring at the camera, have the golfer look thoughtfully at their club or off into the distance, reflecting on their journey.
- Find Open Shade: Position the senior in a location with open shade (e.g., side of the clubhouse, under a tall tree) to guarantee soft, even, and flattering light on the face.
- Create the Legacy Shot: Have the golfer sit on the ground, leaning back against their bag, resting their hands on their favorite club (the “Legacy Shot”) for a relaxed, powerful final portrait.
Pro-Tip: For senior photos, capture details of their class ring or school logo on their hat/bag to further personalize the image and emphasize the achievement.
Technical Mastery: Pro Settings to Freeze Action and Command Light
Inspiration is only half the battle. To execute these ideas, you need to speak your camera’s language. This section provides the precise, technical recipes to overcome the core challenges of golf photography: freezing fast motion and controlling harsh light. Mastering these settings is what separates amateur snapshots from professional action shots and portraiture.
The Critical Role of Shutter Speed in Capturing the Swing
Shutter speed is the single most important setting for golf action photography. The club head can move over 100 mph, requiring extremely fast speeds to avoid blur. A shutter speed that’s too slow is the number one reason for soft or blurry action shots. To ensure every detail of the club, ball, and golfer’s form is crystal clear, you must use a shutter speed that is fast enough to freeze that peak moment.
- Driver/Woods: 1/1600s to 1/2500s
- Irons/Wedges: 1/1000s to 1/1250s
- Putting/Walking: 1/500s to 1/800s
Mastering Aperture and Depth of Field (DoF) on the Course
Aperture dictates your depth of field—how much of the scene is in focus. For isolating the golfer and achieving professional bokeh, use a wide aperture (f/2.8 to f/5.6). This setting creates a shallow depth of field, blurring the background and forcing the viewer’s attention directly onto your subject.
What many guides miss is the powerful relationship between a wide aperture and a long focal length. Using a telephoto lens (like a 200mm) combined with an aperture of f/2.8 or f/4 creates an effect called “telephoto compression.” This not only blurs the background but makes it appear closer and larger, effectively isolating the golfer from busy or distracting surroundings like other players, buildings, or trees. This is the signature look of professional sports imagery and is essential for high-end golf portraits. While an aperture like f/1.8 is tempting, f/4 is often a safer choice for action to ensure the entire golfer remains sharp.
Focus Tracking: How to Keep the Golfer Razor Sharp
Always use Continuous Autofocus (AF-C or Servo Mode) when photographing action. This mode tracks the moving subject and continually adjusts focus until the moment the shutter is released, ensuring sharpness during dynamic movement. Unlike single-shot focus (AF-S), which locks focus once, continuous AF is designed for subjects that don’t stay still.
For the best results, select a single focus point or a small dynamic area and place it over the golfer’s chest or core. This gives the camera a large, stable target to track through the swing. Furthermore, nearly all professional sports photographers use a technique called “back-button focusing,” which assigns the autofocus function to a button on the back of the camera instead of the shutter button. This gives you superior control, allowing you to lock and track focus independently from when you choose to take the picture.
Post-Production Workflow: Editing Golf Photos in January 2026
Capturing a great photo in-camera is the first step; professional post-production is what brings it to life. Editing for golf photography presents unique challenges, namely correcting the high dynamic range between bright skies and dark shadows, and ensuring the color of the greens looks vibrant but natural. This step-by-step workflow for RAW files in software like Lightroom will help you achieve a polished, professional finish.
Step-by-Step Color Correction and Dynamic Range Recovery
- Import and Culling: Import your RAW files and be ruthless. Review your shots and give a 5-star rating only to the images that are critically sharp and have strong composition. Discard the rest.
- White Balance and Exposure: Start by adjusting the global white balance to create the right mood—warm tones for golden hour shots or neutral for midday. Use the sliders to recover highlight detail in the sky and white golf balls, then lift the shadows to bring back detail in faces and dark apparel.
- HSL Panel Mastery (Greens): This is the secret to perfect greens. Navigate to the HSL (Hue, Saturation, Luminance) panel and select the Green and Yellow color channels. Gently increase the Saturation of the greens to add vibrancy, but then slightly reduce the Luminance. This adds richness and depth, preventing the grass from looking artificially bright or blown out.
- Selective Masking: Use radial or linear gradient masks to make targeted adjustments. You can selectively brighten a golfer’s face, darken an overly bright sky, or add a pop of clarity to the golf ball, balancing the scene’s dynamic range with precision.
Professional Sharpening and Export Settings
- Noise Reduction: If you had to push your ISO above 800 for low-light shots, apply a small amount of luminance noise reduction, focusing primarily on the shadow areas.
- Sharpening: When applying sharpening, hold the Alt/Option key while moving the Masking slider. This will show you exactly where the sharpening is being applied. Slide it until only the important edges (the golfer, the club) are white, which prevents you from adding unwanted texture or noise to smooth areas like the sky or blurred background.
- Vignetting and Lens Correction: Apply the standard lens profile correction for your lens to automatically remove any distortion and chromatic aberration. Add a subtle, dark vignette to gently darken the corners of the frame, which naturally draws the viewer’s eye back to the golfer.
- Export: For web use, export your final images as high-quality JPEGs, with the long edge set to 2048 pixels. For print, export as a full-resolution TIFF or DNG to preserve maximum quality.
Planning and Execution: The Pre-Shoot Checklist
A successful golf photoshoot is 90% preparation. Walking onto the course without a plan for lighting, location, and logistics is a recipe for mediocre results. This practical checklist ensures you cover all the critical steps before you ever press the shutter button, with a strong emphasis on the crucial relationship between the photographer and the golf course staff.
Location Scouting and Timing Strategy
- Secure Access: This is the most important step. Contact the course superintendent or manager well in advance to obtain explicit permission. The best time to shoot is often right after the last tee time of the day or before the first one in the morning, so be prepared to schedule for these off-peak hours.
- Map the Light: Don’t guess where the sun will be. Use an app like Sun Seeker to see the exact path of the sun on the day of your shoot. This allows you to identify which holes will be perfectly backlit for sunrise or sunset shots. Prioritize holes with clear views to the east and west.
- Identify Leading Lines: Walk the holes you plan to use before the shoot. Look for natural compositional elements like the sweeping curves of bunkers, cart paths that lead into the distance, or water features that can act as a frame for the golfer.
- Safety and Etiquette: Your right to be on the course is a privilege. Discuss your boundaries with the superintendent. Always yield to active players, stay out of their sightlines, and never make a sound or movement during someone’s swing. Your professionalism ensures you’ll be welcomed back.
Key Takeaways: Your Quick Guide to Professional Golf Photos
Feeling ready to hit the course? Here’s a quick summary of the most important points to remember.
- Top 5 Pro Takeaways:
- Master Shutter Speed: Never shoot the full swing below 1/1600s; use Shutter Priority (Tv/S) to guarantee sharp action.
- Hunt Golden Hour: Schedule 30 minutes after sunrise or before sunset for the most flattering, dramatic, and soft light on the course.
- Use Telephoto Compression: Utilize lenses 85mm to 200mm with wide apertures (f/2.8-f/4) to isolate the golfer and compress the beautiful course background.
- Don’t Fear the Flash: Use High-Speed Sync (HSS) flash during midday to effectively overpower the sun and create balanced, dramatic portraits.
- Personalize the Pose: Go beyond the standard swing shot. Capture emotional reactions, relaxed lifestyle moments, and meaningful equipment details to tell a story.
FAQs About golf photoshoot
What is the recommended minimum shutter speed for freezing a golf swing?
For professional results, the minimum recommended shutter speed is 1/1250th of a second for irons, and preferably 1/1600th of a second or faster for driver swings. This ensures the club and ball are critically sharp without any motion blur.
What should the golfer wear to achieve the best look in a photoshoot?
Golfers should wear clean, current, high-quality golf apparel that provides slight contrast against the green background. Avoid loud or excessive logos. Solid, deep colors (navy, charcoal, forest green) or classic white often photograph best.
How can I deal with harsh shadows on the golfer’s face during a bright day?
The two primary solutions are using a large reflector to bounce light back into the shadows (fill light), or utilizing a powerful off-camera flash set to High-Speed Sync (HSS) mode to effectively overpower the sun and create even illumination.
Is it difficult to get permission to photograph on a private golf course?
It can be challenging, but clear, professional communication is key. Always contact the course manager or superintendent well in advance. Emphasize that you will adhere strictly to all golf etiquette, avoid active play, and have the necessary liability insurance.
What is “bokeh” and why is it important in golf photography?
Bokeh refers to the aesthetic quality of the blur in the out-of-focus parts of an image. In golf photography, achieving beautiful, soft bokeh (using wide apertures like f/2.8) is critical for isolating the golfer from distracting backgrounds and giving the image a high-end, professional look.
Final Thoughts
Moving beyond a snapshot and into professional golf photography requires a blend of creative inspiration and technical precision. By mastering the exposure triangle, commanding the light, and approaching each shot with a planned pose, you have the blueprint to create powerful, memorable golf imagery. Now that you have 11 distinct ideas and the technical recipes to achieve them, which idea are you most excited to try on your next shoot? Share your favorite planned shot in the comments below
Last update on 2026-01-16 / Affiliate links / Images from Amazon Product Advertising API

