As an Amazon Associate GolferHive.com earns from qualifying purchases.
Genius Hole in One Party Ideas Plus Age Safe Planning
Struggling to plan a first birthday that’s both unique and adorable? You want a celebration that stands out, but the planning feels overwhelming.
A Golf First Birthday Party is a thematic event that uses golf imagery to celebrate a baby’s first year. The real challenge is making this sophisticated theme safe, fun, and easy for a one-year-old’s milestone.
A “Hole in One” first birthday is a charming celebration that leverages a green and white aesthetic, clever golf puns, and age-safe props to mark a baby’s 2026 milestone with style. This guide provides genius, safety-vetted ideas and a step-by-step plan to help you host the perfect “par-tee” with zero stress.
Are You Ready for the Ultimate “Hole in One” First Birthday Par-Tee?
Choosing a theme for a first birthday is a huge decision. You want something memorable, photogenic, and special. As experienced parents who have planned milestone events, we know the pressure is real. The “Hole in One” or “Par-Tee” first birthday is a fantastic choice because it’s visually stunning, full of creative potential, and can be adapted to any budget.
This ultimate planning guide is designed to walk you through every step. We’ll cover high-impact decorations, infant-safe activities, and clever food ideas that will impress your guests. Our focus is on providing stress-free, actionable steps so you can enjoy this precious milestone. We’ve vetted every idea for safety, ensuring your little one can celebrate without any hazards. Get ready to create a beautiful and unforgettable golf birthday celebration.
9 Genius “Hole in One” Party Ideas Plus Age Safe Planning
Here are nine curated ideas that cover every aspect of your celebration. Each concept has been selected based on its visual impact, ease of execution, and adherence to infant safety guidelines. From the moment guests arrive to the final photo op, these parent-tested strategies ensure a cohesive and delightful event.
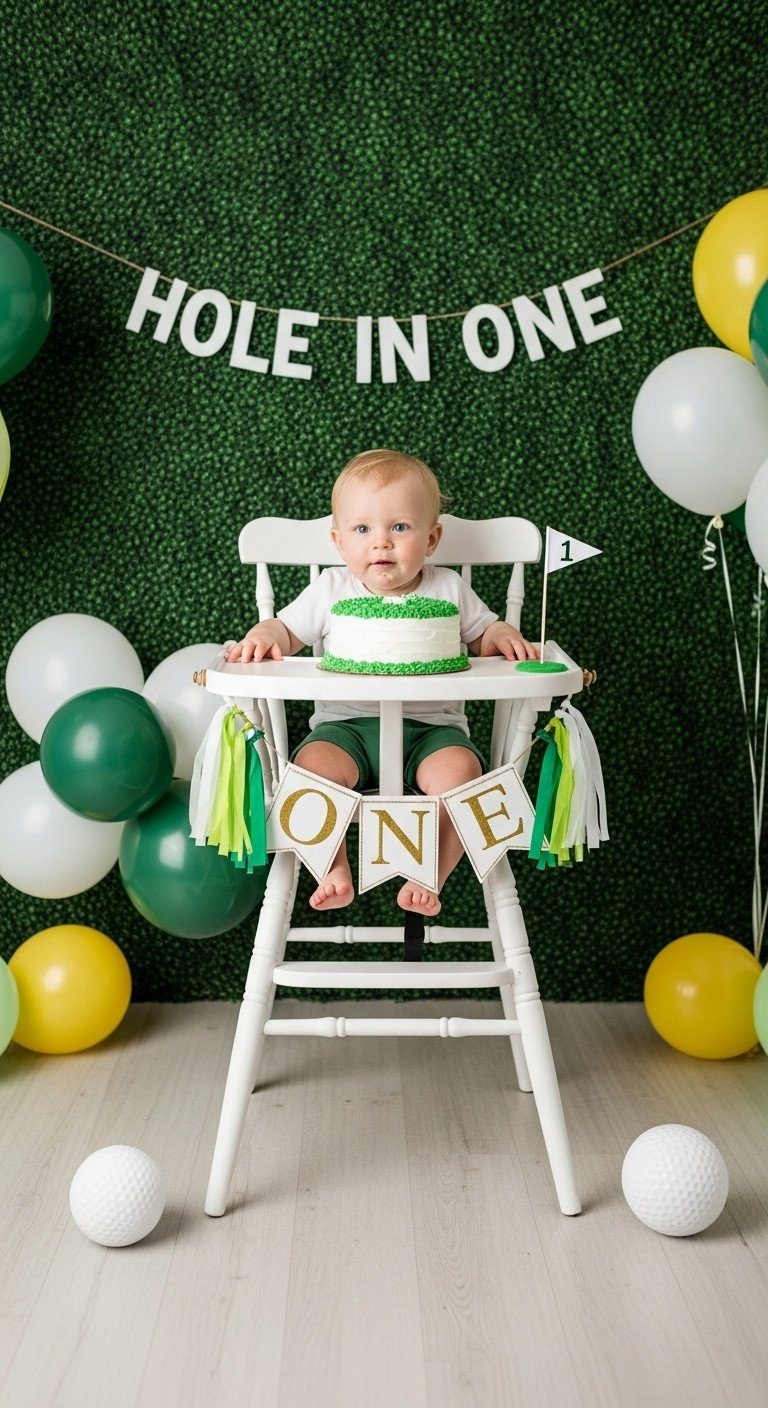
1. Designing the Ultimate Smash Cake Zone & Photo Backdrop
Pin this genius tips to your ‘Dream Birthday’ board!
The smash cake is the highlight of any first birthday. Creating a dedicated, beautifully styled zone for this moment is essential for capturing those priceless photos. The key is a vibrant, non-shedding faux grass backdrop that immediately establishes the golf theme.
Materials Needed:
- Non-shedding artificial turf or green felt (3×5 ft minimum) for backdrop
- Basic wooden or plastic high chair (painted white or neutral)
- Personalized ‘ONE’ or ‘Hole in One’ banner (ensure secure hanging mechanism)
- Balloon garland kit (green, white, yellow balloons)
- Large, simple white or yellow cake suitable for smashing
- Flagstick number 1 cake topper (plastic or sturdy cardboard)
Step-by-Step Directions:
- Secure the faux grass or green felt to a portable frame or clear wall using temporary adhesive or heavy-duty backdrop clips, ensuring it lies flat and smooth.
- Inflate the balloons and attach them to the frame or wall in an asymmetrical garland around the upper edge of the grass backdrop.
- Secure the personalized banner to the front tray or chair legs of the high chair using strong double-sided tape or ribbon, ensuring the baby cannot pull it down.
- Position the high chair directly centered against the backdrop for optimal lighting, ensuring the area is clear of all clutter and any small parts.
- Place the smash cake and topper on the tray just before the scheduled photo time, making sure the baby is well-rested and happy.
Pro-Tip: Schedule the cake smash 30 minutes after the baby wakes from their second nap to maximize their cheerful disposition and ensure the best photos.
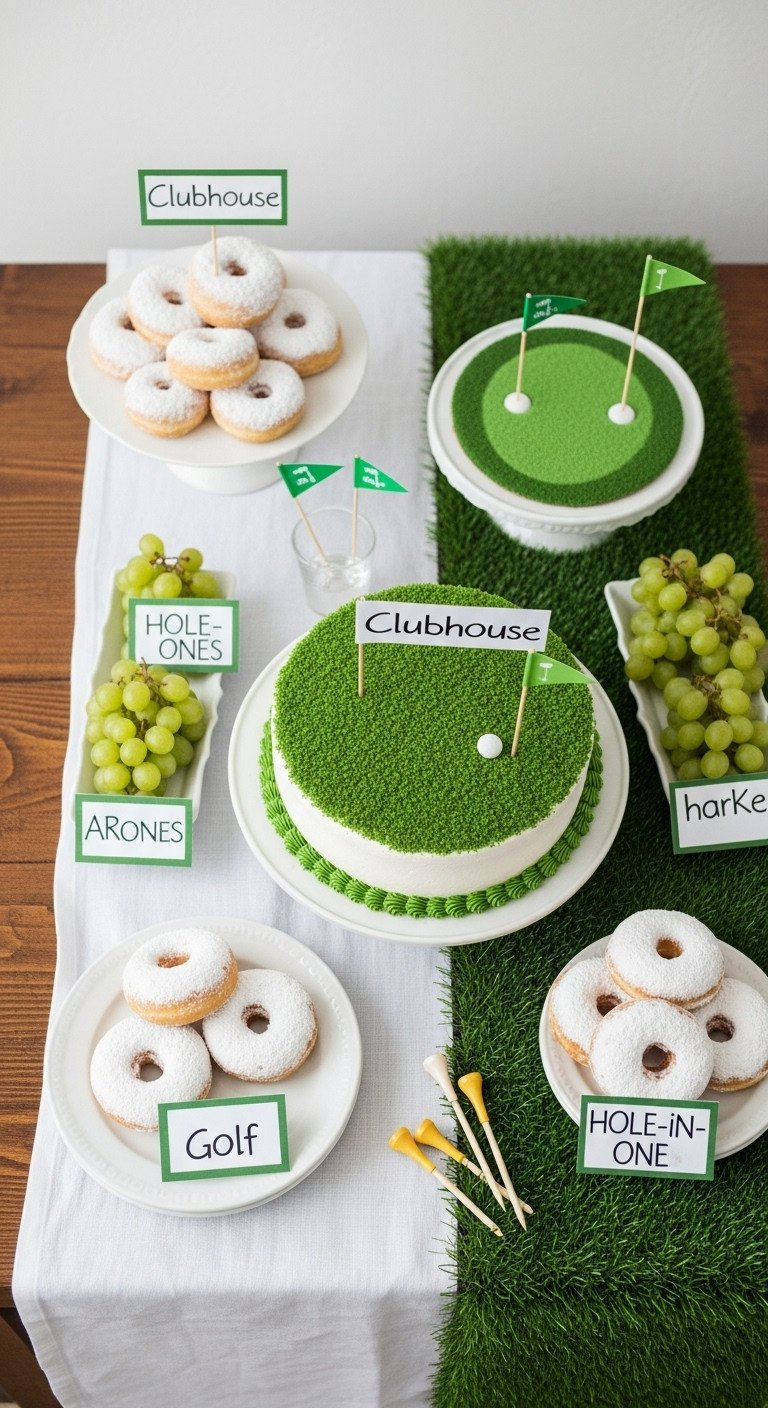
2. Creating a Signature Thematic ‘Clubhouse’ Food and Dessert Table
Save this clever organization idea!
A well-organized and creatively labeled food table can be a central decor piece. The trick is to use simple, recognizable foods and give them clever, golf-themed names. This approach adds personality and engagement without requiring complex recipes.
Ingredients & Supplies Needed:
- Green grapes, kiwi slices, and green apple wedges
- White powdered donuts (the ‘Hole-in-One’ centerpiece)
- Finger sandwiches (crusts removed) or sliders (the ‘Club Sandwiches’)
- White powdered dip (e.g., ranch/hummus) for the ‘Sand Traps’
- Printable or handwritten food label cards
- Small, non-choking golf tee skewers (for adult use only)
- Large white serving platters and tiered stands
Step-by-Step Directions:
- Prepare all food items one day in advance (e.g., cut fruits, assemble sandwiches, bake/buy cake).
- On party day, arrange the main dessert (the ‘Hole-in-One’ donuts) on a prominent tiered stand at the center of the table.
- Place the ‘Sand Trap’ dip in a white bowl and surround it with thin wafer crackers or white corn chips.
- Arrange all green fruit (grapes, kiwi) in white bowls to represent ‘Golf Balls’ and ‘The Green.’
- Create the food labels using the golf puns (Bunker Bites, Par-Fait, Water Hazard Punch) and place them securely in front of each corresponding dish.
- CRITICAL SAFETY STEP: Designate a clearly marked platter of only infant-safe foods (plain rice puffs, finely diced soft fruits) near the smash cake zone, separate from the main table.
Pro-Tip: Use small, plastic toy golf carts to hold napkins and cutlery, adding an extra layer of thematic detail to the table setup.
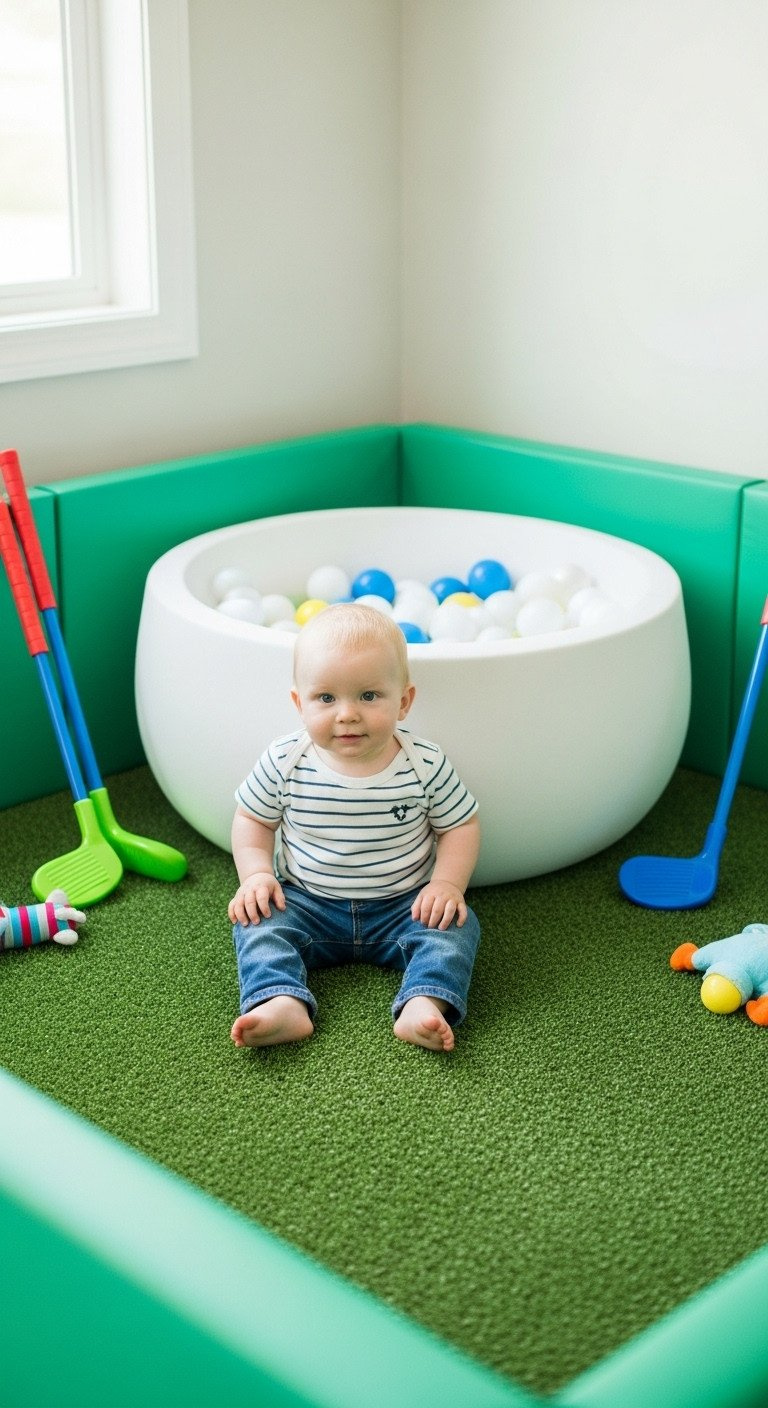
3. Planning an Age-Safe Putting Green Activity Zone
Save this safety-approved infant activity idea!
A one-year-old’s attention span is short. Instead of structured games, create a simple, safe, and sensory-rich play zone. This “putting green” is an unstructured area where infants can crawl, explore, and interact with safe, oversized props.
Equipment Needed:
- Soft, thick play mat or low-pile artificial turf rug (easily sanitized)
- Oversized, soft foam golf balls (NO standard golf balls or small items)
- Miniature, lightweight plastic golf clubs (for photo ops only, supervised)
- Low-to-the-ground barrier (like a short playpen or secured cushions)
- Large, safe bucket or bin (the ‘Hole’)
Step-by-Step Directions:
- Designate a low-traffic area for the activity zone, preferably on soft carpeting or padding, ensuring it is away from electrical outlets and stairs.
- Cover the floor area with the green turf or mat, ensuring there are no loose edges that could cause a trip hazard.
- Place the large bucket or bin on the mat (this is the ‘Hole’) and scatter the oversized foam golf balls around it.
- Set the miniature plastic clubs aside for supervised use only or for adult photo opportunities.
- Allow infants to crawl, roll, and practice grasping the soft balls. This is an unstructured, sensory experience that matches their short attention span.
- Safety Check: Before opening the zone, thoroughly sweep the area for any small parts, loose tees, or choking hazards. Assign one adult (a ‘Safety Caddie’) to supervise the area constantly.
Lesson Learned: Keep the party duration under two hours. The success of the party hinges on managing the infant’s energy levels; 10-15 minutes of dedicated play time is often sufficient before a nap or change is needed.
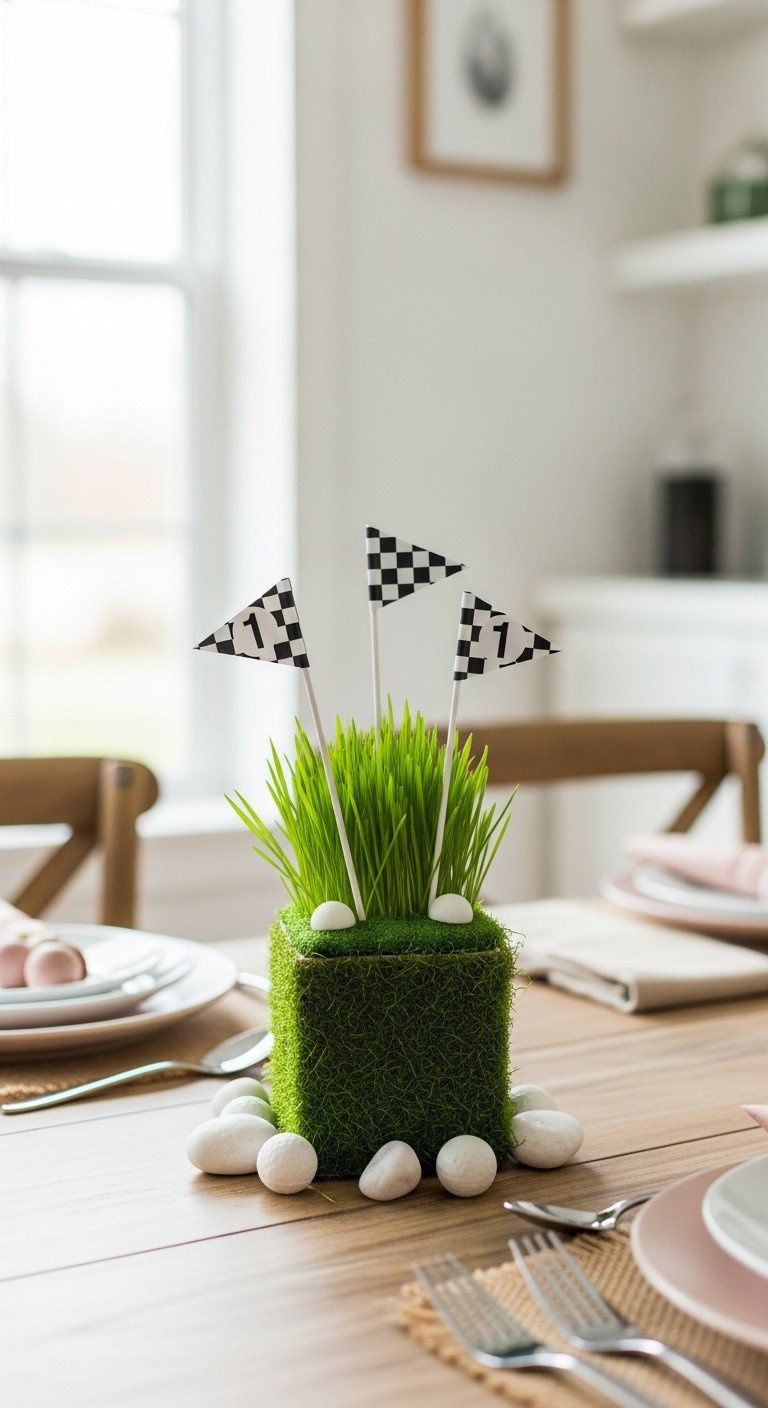
4. Thematic DIY: Effortless Flagstick Centerpieces
Save this easy DIY centerpiece idea!
Simple, repeatable decor is key to a cohesive look. These DIY flagstick centerpieces are cost-effective, easy to assemble, and add a touch of natural texture with wheatgrass or moss, perfectly capturing the golf course feel.
Materials Needed:
- Small terracotta or white ceramic pots (one per table)
- Vibrant green moss or small trays of wheatgrass (easily found at garden centers)
- Thin wooden dowels (about 12 inches long)
- White and checkered scrapbook paper or felt for flags
- Hot glue gun and scissors
- White candy melts or painted river stones (to represent golf balls)
Step-by-Step Directions:
- If using wheatgrass, simply place the tray inside the pot. If using moss, fill the pot with floral foam and cover the top with the moss.
- Cut the scrapbook paper or felt into small triangular or rectangular flags (approximately 2×3 inches). If possible, print small ‘1’s onto the flags.
- Securely hot glue one flag to the top of each wooden dowel, ensuring the flag is fully attached and won’t slip off.
- Insert 2-3 finished flagstick dowels into the moss or wheatgrass in the pot, adjusting the height slightly for variation.
- Scatter the white candy melts or painted stones around the base of the centerpiece to complete the look.
- Styling Tip: For a rustic look, wrap the pot in a simple piece of burlap ribbon before adding the grass.
Pro-Tip: Make one large version for the main food table and smaller versions for guest tables to maintain a consistent visual hierarchy (Rule of Three).
5. Budget-Friendly Guest Favors: Tee-ing Up Thanks

Pin this cute party favor idea!
Party favors for a first birthday should be simple, thematic, and budget-friendly. A small bundle of personalized golf tees or pencils is a practical gift for adults and older kids that perfectly matches the theme.
Materials Needed:
- Plain white or green wooden golf tees (bulk purchase)
- Personalized golf pencils or mini golf notebooks
- Cellophane bags or small burlap sacks
- Green ribbon or twine
- Printable or custom-ordered favor tags with the pun “Thanks for Par-Tee-ing With Us!”
Why It Works (Gifting Tips):
- Customization: Personalized golf tees or pencils offer a sweet, subtle reminder of the baby’s first birthday that adults and older children can actually use. This provides high sentimental value at a low bulk cost.
- Assembly: Fill the bags with 3-4 tees and one pencil or small notebook. Attach the custom tag using the green ribbon or twine, ensuring the knot is tight and secure.
- Display: Arrange all the completed favor bags in a designated “Pro Shop” area—a simple basket or tiered stand with a custom sign. Placing this near the exit ensures guests remember to grab one as they leave.
- Safety Disclaimer: Clearly mark or keep separate any favors containing small items (tees) away from the infant play area and out of reach of babies/toddlers.
Lesson Learned: Skip elaborate, expensive favors. Simple, functional items customized with a pun or the party date create a better impression and fit within a tighter budget.
6. Mastering Thematic Attire: Caddies and Baby Golfers

Pin this adorable baby outfit inspiration!
The birthday baby’s outfit is a key part of the theme. A miniature “caddie uniform” is adorable, easy to assemble, and comfortable for the little one. Comfort is the top priority to ensure a happy baby throughout the event.
Outfit Pieces & Customization:
- Primary: White or light green polo shirt (check for soft cotton material)
- Bottoms: Khaki shorts or a simple green/plaid diaper cover/skirt
- Accessories: Simple sun visor or custom baseball cap (personalized with ‘1’ or initials)
- Shoes: Tiny white sneakers or matching sock/shoe combo
- Optional: Small personalized caddie bib/vest (lightweight felt or fabric)
Styling Tips & Safety:
- Prioritize Comfort: Ensure the outfit is loose, breathable, and easy to move in. Avoid itchy fabrics or restrictive accessories, as comfort is key for a happy baby.
- The Caddie Look: The most recognizable elements are khaki and white. Personalize a cheap cap or visor with a felt ‘1’ to complete the look without excessive cost.
- Smash Cake Strategy: Plan to have two outfits. The first, pristine outfit is for guest arrival and family photos; the second is a simple diaper cover or bodysuit dedicated solely to the messy smash cake moment, saving the main outfit.
- Siblings/Parents: Encourage older siblings to wear matching polo shirts or green and white argyle patterns to act as the ‘Junior Caddies’ or ‘Golf Pros’ for cohesive family photos.
Pro-Tip: If using a hat or visor, ensure the baby is accustomed to wearing it beforehand, or only use it briefly for photos to avoid fussiness during the main event.
7. Thematic Drink Station: The “Water Hazard” Beverage Cart
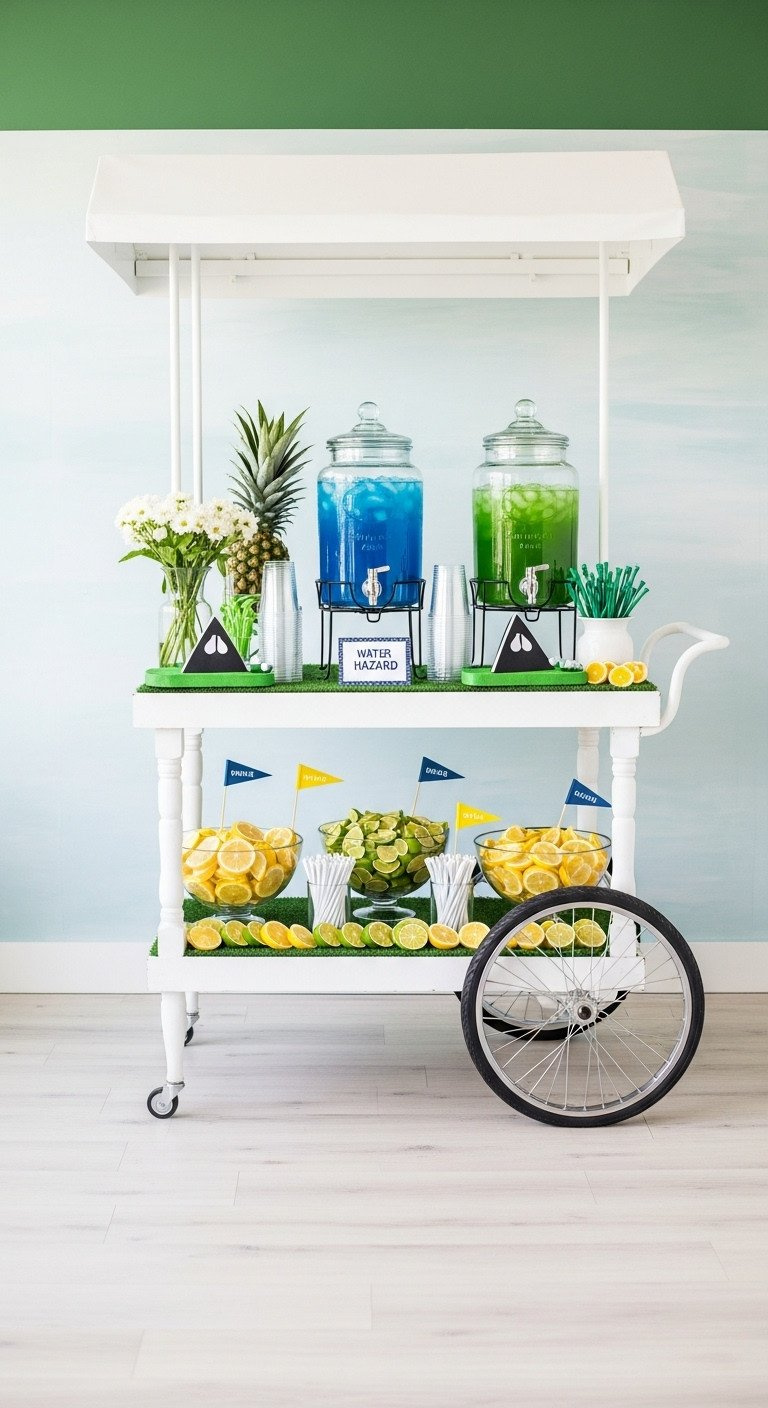
Save this DIY beverage station tutorial!
Transform a simple rolling cart into a thematic “Water Hazard” or “19th Hole” beverage station. This DIY project serves as another functional decor piece, offering guests refreshing drinks while reinforcing the golf party theme with clever naming and colored liquids.
Materials Needed:
- Rolling utility cart or a small, refinished vintage bar cart (white preferred)
- Green or blue vinyl wrap/paint for thematic accent
- Clear beverage dispensers (2-3 large capacity)
- Ingredients for green iced tea or blue non-alcoholic punch
- Printable ‘Water Hazard’ or ’19th Hole’ sign
- Small, decorative white buckets to hold straws and napkins
Step-by-Step Directions:
- Cart Preparation: Clean the rolling cart thoroughly. If customizing, apply the vinyl wrap or paint the cart in green/white colors, allowing ample time for drying/curing.
- Thematic Drink Prep: Mix the beverages in advance. Use green food coloring in lemonade or iced tea, or blue sports drink/punch for the ‘Water Hazard’ effect.
- Assembly: Place the beverage dispensers on the cart. Arrange cups, napkins, and straws in the small white buckets.
- Styling: Use a small piece of faux grass on one shelf of the cart as a runner. Place a bowl of lemon and lime slices next to the dispensers for guests to add to their drinks. Secure the ‘Water Hazard’ sign prominently on the top shelf.
- Infant Option: Always include a clearly labeled, plain water station or small juice boxes suitable for toddlers, separated from the main ‘Hazard’ area.
Pro-Tip: If using a DIY cardboard or wood facade to create a ‘Golf Cart’ look, ensure it is sturdy and weighted down so it cannot tip over onto children.
8. Thematic Welcome: The “Golf Course” Green Carpet Entrance
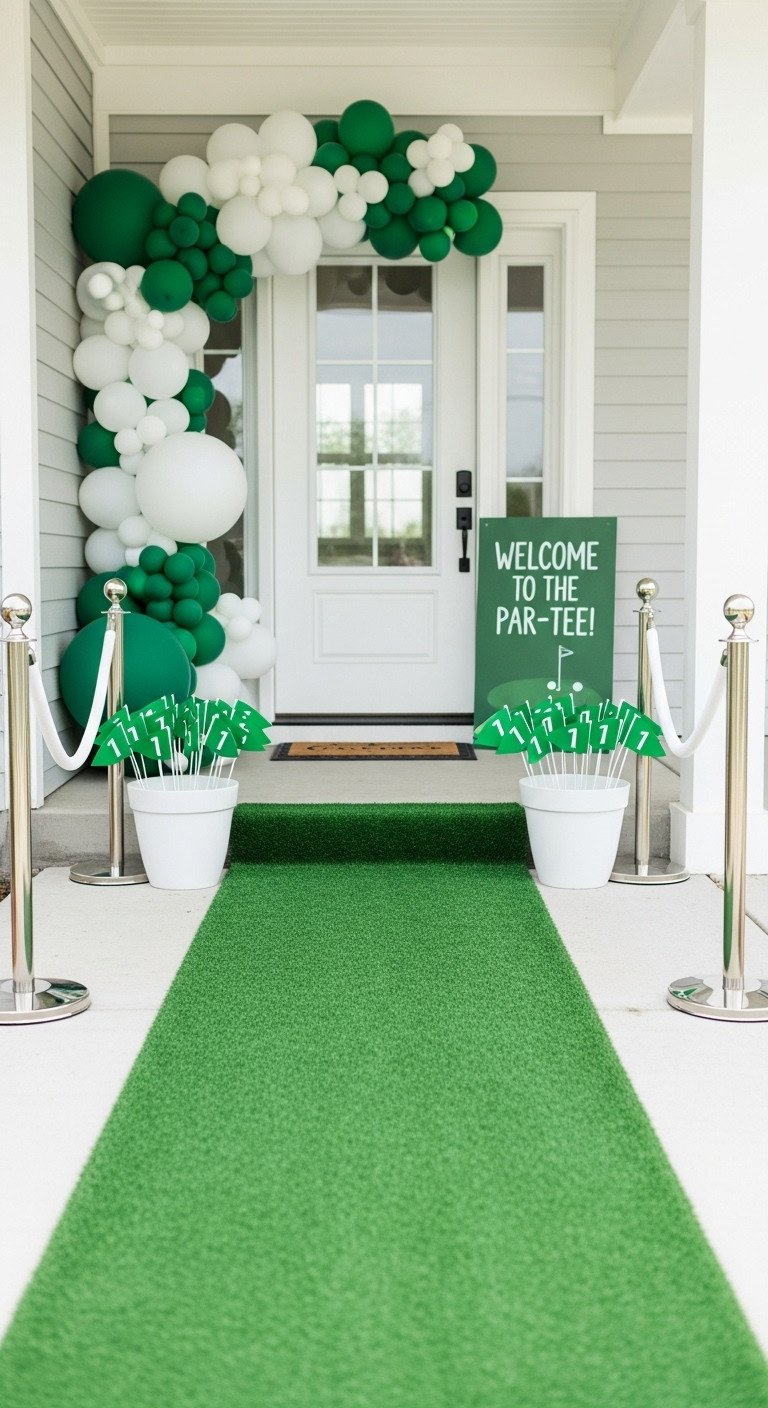
Save this high-impact entrance idea!
Make a memorable first impression by creating a “green carpet” entrance. An artificial turf runner instantly transforms your entryway into a golf course pathway, setting the tone for the entire event from the moment guests arrive.
Materials Needed:
- Green outdoor-grade artificial turf runner (10-15 ft long)
- Large, simple wooden or printable welcome sign (Par-Tee theme)
- Two large white planters or buckets
- Decorative flagsticks with the number ‘1’ flag (or ‘hole’ numbering)
- Sand or gravel (to weigh down planters)
- Temporary, non-slip adhesive or tape (for turf security)
Step-by-Step Directions:
- Turf Placement: Roll out the artificial turf runner leading directly to the party entrance. Secure the edges with non-slip tape or weights, especially if placed on a slick surface like wood or tile, to prevent tripping hazards.
- Weighting: Fill the two large planters with sand or gravel for stability. Place one flagstick securely in each planter.
- Flanking: Place the weighted planters/flagsticks on either side of the turf runner at the start of the ‘Green Carpet’ or near the doorway.
- Signage: Mount the themed welcome sign near the door or on an easel next to the carpet. Ensure the sign clearly directs guests to the entrance.
- Aesthetic Check: Ensure the turf is clean and wrinkle-free, creating a seamless ‘golf course’ path for guests to walk down.
Pro-Tip: Buy a turf runner that is also water-resistant, allowing you to use it as a tabletop runner or floor accent inside the party area later, maximizing the budget.
9. Designing Custom ‘Masters Par-Tee’ Printable Signage
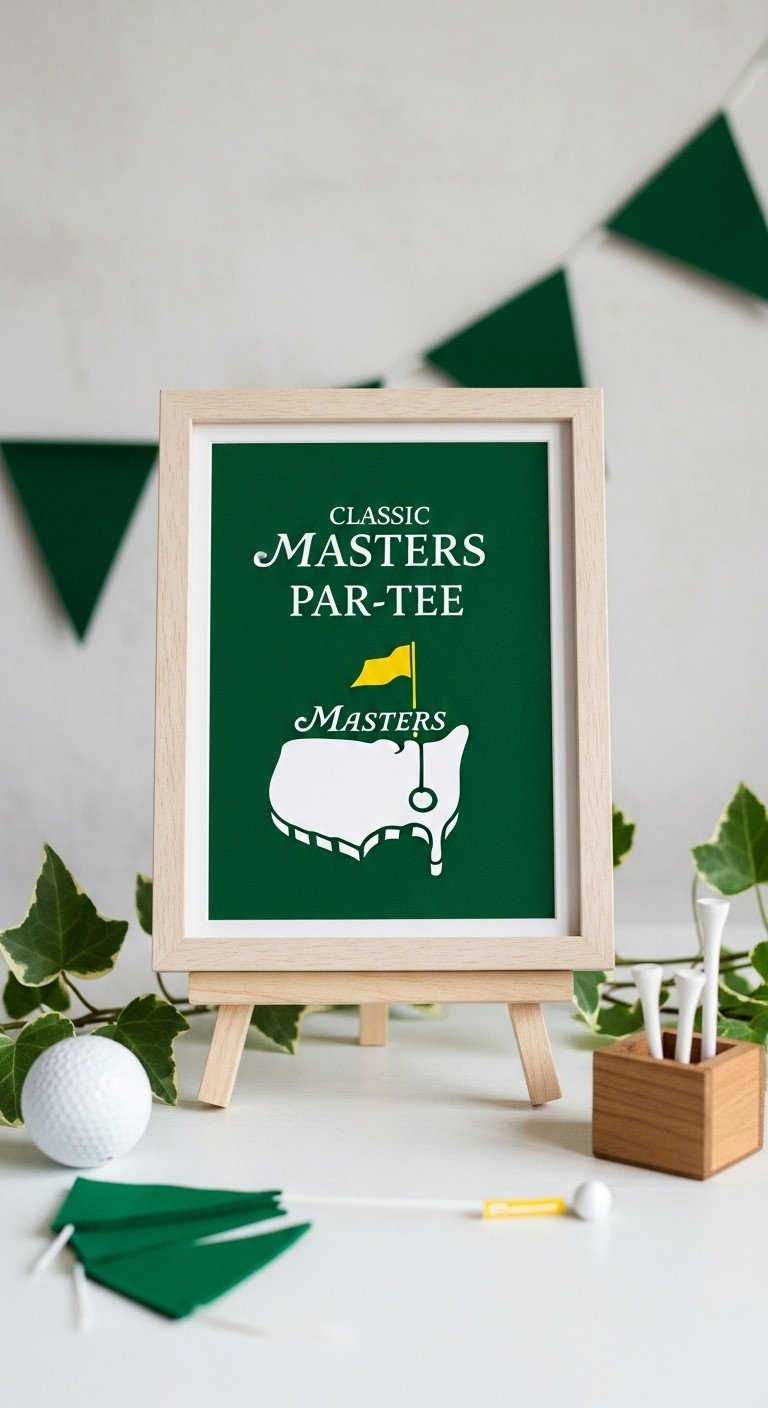
Pin this easy printable decor idea!
For a more sophisticated “Masters Par-Tee” variation, printable signage is your best friend. Using templates with professional typography allows you to create a high-end, cohesive look for welcome signs, food labels, and banners on a DIY budget.
Tools & Resources:
- High-quality printer and white cardstock paper (80-100 lb weight recommended)
- Digital printable templates (Etsy vendors often offer themed bundles)
- Simple wooden or white photo frames (various sizes)
- Craft cutting machine or sharp scissors/paper cutter
- Double-sided tape or clear mounting putty
Action Plan / Workflow:
- Template Procurement: Purchase or download a cohesive set of printable templates (invitations, food labels, welcome signs) that utilize the desired green/white color palette and professional typography (e.g., the ‘Masters’ style).
- Personalization: Edit the digital files to include the baby’s name, the date, and the required food/drink labels. Double-check all spellings and dates before printing.
- Printing and Cutting: Print all signage on heavy cardstock for a professional feel. Use a sharp paper cutter or craft machine to achieve clean, crisp edges on all labels and signs.
- Framing and Display: Insert the printed signs into simple frames and distribute them strategically around the venue (welcome sign at the entrance, directional sign to the bathroom/activities, framed quotes).
- Cohesion Check: Ensure all signs use the exact same color codes and font style for maximum thematic authority and visual consistency.
Pro-Tip: Print small, personalized ‘scorecards’ and scatter them on the tables instead of using traditional place cards; they double as a fun, themed decorative element.
Essential Logistics: Age Safety, Budget Tiers, and Your January 2026 Checklist
Beyond the creative ideas, successful execution relies on solid logistics. This section provides the critical information gain most guides miss: a clear safety protocol, a flexible budget framework, and an actionable timeline to ensure your par-tee goes off without a hitch.
Critical Infant Safety Checks for Golf Themes
Infant safety must be the highest priority when planning a golf-themed party. The primary hazard is choking due to small parts. Solution: Use only oversized foam or plastic golf balls and tees, and ensure all decor with small components (like real golf tees or small candies) is securely placed high out of reach of all children. Review the menu to eliminate choking hazards and allergens for the one-year-old (no whole nuts, grapes, or hard candies). Supervise the play area constantly.
Tiered Budget Framework: Low, Medium, and High Cost
A tiered budget framework provides flexibility based on resources.
* Low Budget ($300-$500): Focus on DIY printables (signage, labels), homemade smash cake, simple green/white paper goods, using only the backyard/living room venue.
* Medium Budget ($600-$1000): Add a pre-made décor bundle (banner, balloons, turf runner), outsource the smash cake, and include personalized favors (tees/pencils).
* High Budget ($1000+): Custom catering, specialized Masters Par-Tee typography, custom high-end attire, and potentially an external venue rental or professional event planner consultation.
Your 6-Week “Hole in One” Planning Checklist
A 6-week timeline is ideal for managing custom orders and logistics.
1. Week 6: Finalize the theme (Hole in One vs. Masters), set the budget, and create the guest list.
2. Week 5: Order custom items (invitations, smash cake topper, personalized banner) and send out invitations (4-6 weeks prior).
3. Week 4: Purchase all non-perishable supplies (turf, plastic clubs, paper goods, favors) and finalize the menu plan.
4. Week 3: Start DIY projects (centerpieces, beverage cart, signage) and purchase/assemble all party favor components.
5. Week 2: Confirm RSVPs, purchase non-alcoholic beverages, and create the party day schedule (centered around baby’s nap time).
6. Week 1: Confirm cake order, purchase fresh food, clean the party area, set up all large decor (backdrops, entrance runner), and charge the camera battery.
FAQs About golf first birthday party
What colors are essential for a golf theme?
The essential color palette for a cohesive golf theme is emerald green (representing the turf), crisp white (representing the balls and clean lines), and a subtle yellow or gold accent (for the sun, sand traps, or sophisticated Master’s typography). Sticking strictly to these colors ensures thematic consistency.
What is the average cost of a themed smash cake?
The average cost for a specialized themed smash cake (like a tiered cake with turf frosting and flagstick toppers) typically ranges from $75 to $150, depending on complexity, size, and bakery location. A simple, small round cake with green buttercream DIY frosting can be made for less than $20.
Should I include activities for adults at a one-year-old party?
Yes, absolutely, but keep them simple and conversational. Adults often appreciate simple photo opportunities (thematic backdrop), creative food/drink stations, or just being able to watch the baby and socialize. Avoid structured games that require too much focused attention from busy parents.
Final Thoughts
You have all the “genius ideas” and the safety-vetted plan to execute the perfect Hole in One First Birthday Party for your little one’s milestone. By prioritizing the smash cake zone, managing your budget using the tiered framework, and ensuring every decor element is safe for little hands, you will create a truly memorable event that celebrates their first 2026 with thematic style and ease. Now, choose your favorite idea, start your checklist, and get ready for the best par-tee of the January! What part of your ‘golf course’ are you most excited to set up first?
Last update on 2026-01-17 / Affiliate links / Images from Amazon Product Advertising API

