As an Amazon Associate GolferHive.com earns from qualifying purchases.
11 Genius Golf Cart Decorating Ideas To Win Every Contest
Struggling to make your golf cart stand out in a sea of tinsel? You’re not alone. Winning a parade or contest requires more than just a few lights.
This is a complete guide to contest-winning golf cart decorating ideas. It moves beyond simple concepts to give you the technical know-how for a flawless finish. You’ll find unique themes and the expert steps to bring them to life safely.
Our 11 genius golf cart decorating ideas combine professional parade float design principles with verified safety standards, giving you the ultimate blueprint for victory. We’ll cover everything from structural integrity and power management to the high-impact themes that grab judges’ attention. Get ready to transform your cart into an unforgettable masterpiece.
The Master Guide to Winning: Unlocking 11 Genius Golf Cart Decorating Ideas for 2026
To truly dominate a golf cart decoration contest, your approach needs to be strategic. It’s about combining a show-stopping theme with flawless, safe execution. The best golf cart themes are immediately recognizable, showcase high-quality craftsmanship, and consider the entire experience, from lighting to the passengers’ costumes. This guide is curated based on professional parade float design principles, ensuring every idea is not only visually stunning but also structurally sound and safe. We’ll explore unique golf cart decorating ideas that are guaranteed to score high marks with judges and leave a lasting impression on your community.
Before You Start: Safety, Power, and Structural Integrity (CRITICAL)
Before you attach a single decoration, understanding the technical limits of your electric golf cart is non-negotiable. Many competitors overlook these critical details, leading to dead batteries, damaged carts, or decorations failing mid-parade. This section provides the foundational knowledge you need to decorate safely and effectively. According to professional golf cart technicians, managing your electrical system and securing your structure properly are the keys to success.
A critical disclaimer: Modifying your golf cart’s electrical system or structure can void its warranty. Always use properly rated fuses on any new circuit you create to prevent damage or fire.
Here is a quick safety checklist for any project:
* Calculate Total Amp Draw: Add up the amperage of all your lights and accessories. This helps you understand the total load on your power source.
* Use a Fused Voltage Reducer: For powering 12V accessories from your cart’s 48V electrical system, always install a fused DC-to-DC voltage reducer. For high-draw items, use a separate, external battery.
* Secure All Props Securely: Use multiple contact points for every decoration. A combination of industrial-strength zip ties, non-marring clamps, and heavy-duty Velcro ensures nothing comes loose.
* Maintain Driver Visibility: Never allow decorations or props to obstruct the driver’s forward view, mirrors, or any required street-legal lighting.
11 Genius Golf Cart Decorating Ideas To Win Every Contest
Discover detailed blueprints that maximize originality and visual impact to satisfy high-level competition criteria. We’ll focus on contest-winning themes that use specialized materials and clear, sequential instructions. The key to a winning design often lies in advanced techniques like using structural foam and weatherproofing materials, demonstrating a superior level of craftsmanship.
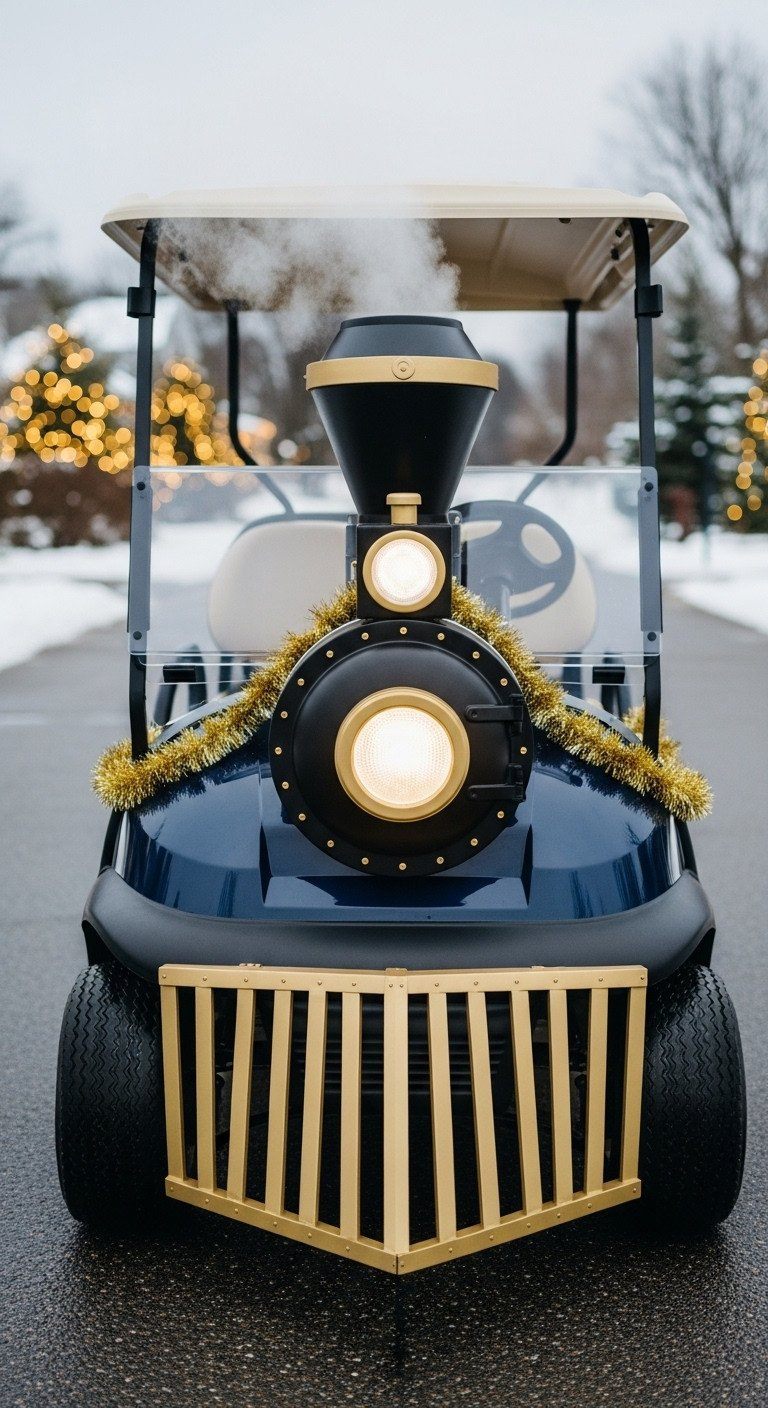
1. The Polar Express Theme: Contest-Winning Christmas Float
Pin this genius tips to your ‘Christmas Parade Dreams’ board!
This high-concept holiday theme is instantly recognizable and allows for incredible detail that will impress any judge in a Christmas golf cart parade. The key is creating structural elements like a cowcatcher and smokestack that transform the cart’s silhouette into a classic steam train.
Materials Needed:
- PVC piping and connectors (1-inch diameter)
- Lightweight XPS foam board (2-inch thickness)
- Weatherproof LED Net Lights (warm white, battery-operated, commercial grade)
- Heavy-duty black or navy-blue marine-grade vinyl sheet
- Gold metallic spray paint
- Industrial-strength UV-resistant zip ties (6-inch and 12-inch sizes)
Step-by-Step Directions:
- Build the Frame: Assemble a lightweight PVC frame that extends past the front bumper and secures directly to the cart’s front frame/roof supports using U-bolts. This frame will support the ‘engine’ structure.
- Fabricate Engine Pieces: Cut the foam board into the shape of a cowcatcher, boiler front, and stack. Seal all foam edges with a thick layer of paint or sealant to improve weather resistance.
- Wrap and Detail: Cover the main cart body components and the PVC frame using the vinyl sheet for a clean, cohesive black ‘train’ look. Affix the painted foam pieces to the PVC frame using construction adhesive and secondary zip ties for redundancy.
- Layer the Lights: Cover the entire structure with the LED net lights. Use solid lines of light along the edges of the cart and structures to define the train shape clearly in the dark.
- Add Smoke: Place a small, battery-operated fog machine or dry ice container (if safe) concealed beneath the foam stack for a ‘smoke’ effect during the parade.
Pro-Tip: Focus lighting density on the front of the ‘engine’ and the roofline; this makes the cart appear larger and more complex from a distance, maximizing judge attention.
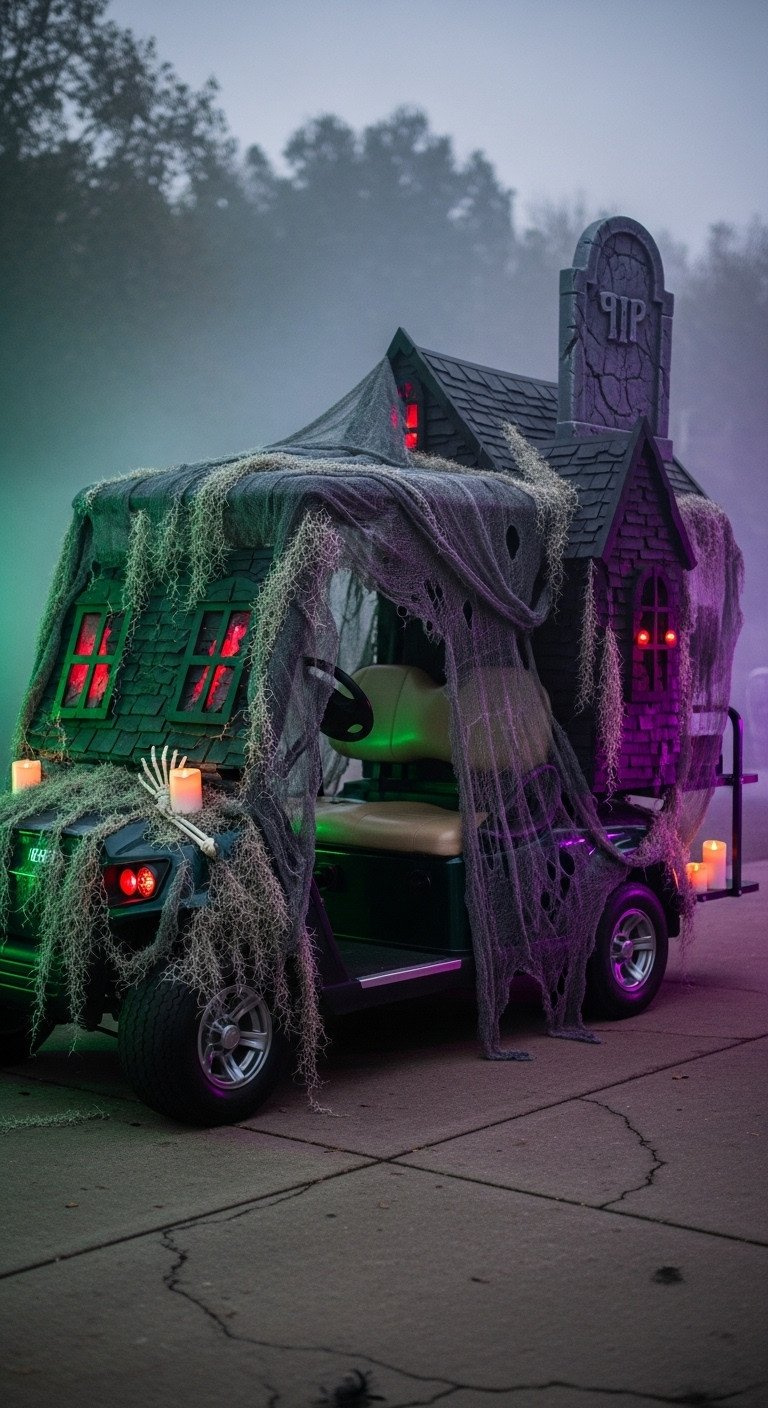
2. The Rolling Haunted Mansion: Spooky Halloween Display
Save this clever organization idea!
This Halloween golf cart theme uses sound, motion, and eerie lighting to create a truly interactive and spooky experience. Integrating motion-activated sound effects and layered green and purple LEDs will score high marks for technical execution and creativity.
Materials Needed:
- PVC pipe or wooden stakes for structural framing
- Tattered grey cheesecloth and dark mesh fabric
- Battery-operated, motion-activated sound module (for spooky noises)
- Green and purple low-voltage LED strip lights
- Lightweight foam board (for tombstone/window cutouts)
- Heavy-duty, adjustable mounting clamps (non-marring)
Step-by-Step Directions:
- Build the Silhouette: Use clamps to temporarily attach a vertical frame (PVC or wood) to the roof struts, extending slightly higher than the roof to create a towering silhouette.
- Drape and Distress: Securely drape the cheesecloth and mesh over the frame and cart, letting it hang low but ensuring it does not obstruct the wheels or lights. Spray the cloth lightly with black or grey paint for a distressed, moldy look.
- Install Interactive Elements: Conceal the motion-activated sound module and lighting battery packs under the seat or within a prop box. Position motion sensors to trigger when the cart stops or when people approach the sides.
- Layer Lighting: Use the green and purple LED strips underneath the cart for an eerie glow (underglow) and place flickering LED candles inside the ‘windows’ cut from the foam board.
- Secure Props: Affix the largest props (tombstones, large spiders) using heavy-duty industrial Velcro and redundant zip ties to ensure they don’t shift during motion.
Lesson Learned: Always ensure the draped fabric is high-quality and secured with multiple points to prevent it from flapping and distracting the driver or getting caught in the wheels.
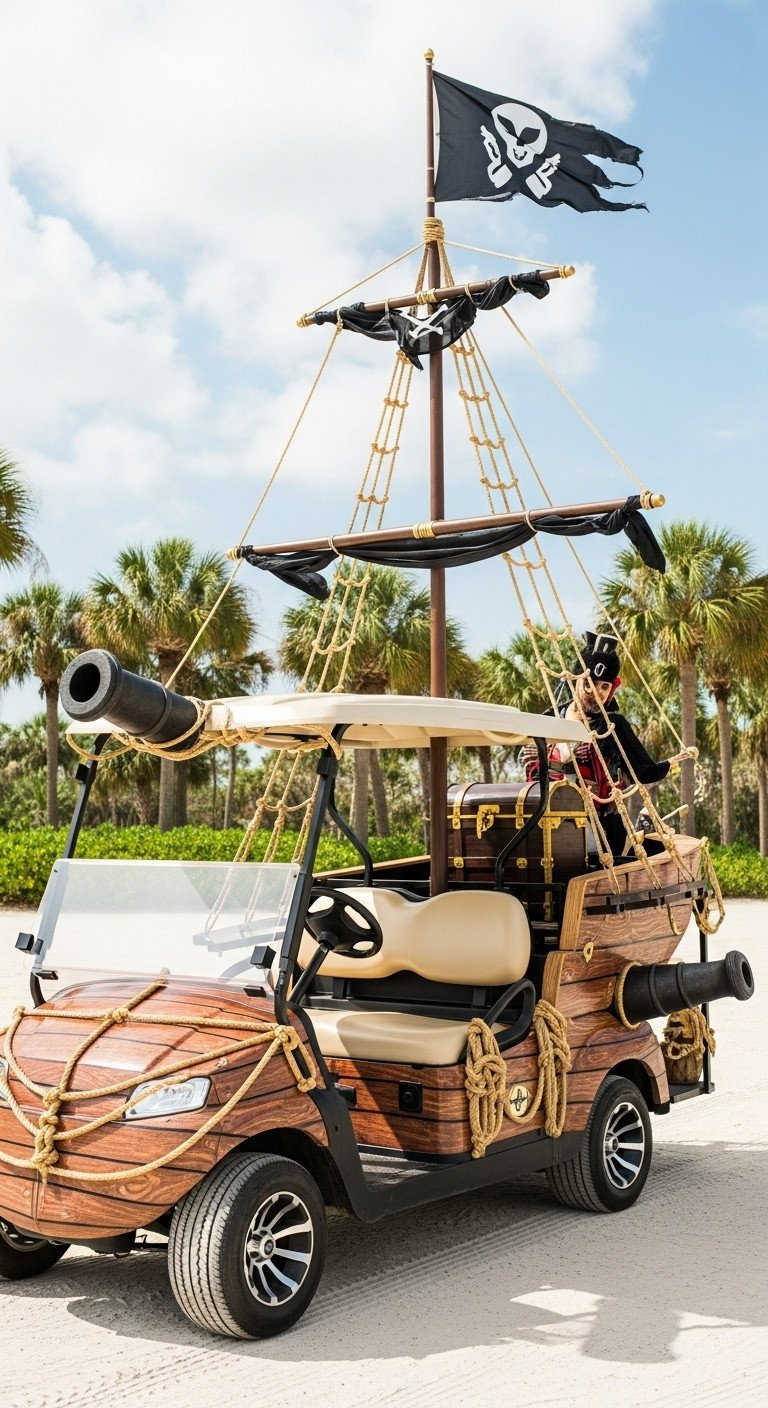
3. The Pirate Ship Galleon: Maximizing Structural Impact
Pin this structural theme idea before your next contest!
For those looking for unique contest-winning themes, building a large, high-impact structure like a pirate ship is a guaranteed showstopper. This design utilizes the cart’s frame for support, ensuring the mast and hull are stable even while moving.
Materials Needed:
- Schedule 40 flexible PVC piping (1.5-inch diameter) for the mast and hull frame
- Brown wood-grain marine-grade vinyl wrap (or heavy paint on foam board)
- Lightweight black fabric for the sail/flag
- Heavy-duty non-marring roof clamps and U-bolts (to secure the mast base)
- Foam board or cardboard tubes for cannon fabrication
Step-by-Step Directions:
- Install the Mast Base: Using the U-bolts, secure the base of the PVC mast directly to the strongest point on the roof struts or rear frame, ensuring the connection is extremely rigid. The mast should be easily disassembled for transport.
- Build the Hull: Construct lightweight frames using PVC piping or foam board to extend the cart’s sides, mimicking a ship’s hull. Wrap or paint these elements in the weathered brown finish.
- Attach Hull Panels: Secure the hull panels using industrial strength Velcro along the cart’s plastic body panels, supplemented by zip ties around any accessible frame points.
- Fabricate Cannons and Rails: Create lightweight foam or tube cannons and affix them to the hull panels. Add sound effects (cannon fire loop) concealed inside the cart.
- Hoist the Flag: Attach the tattered fabric flag securely to the top of the mast. Ensure the overall height complies with any parade or community height restrictions.
Pro-Tip: Distribute the structural weight (even though lightweight) evenly. Use the highest quality clamps possible on the roof supports, as the mast will catch significant wind resistance.
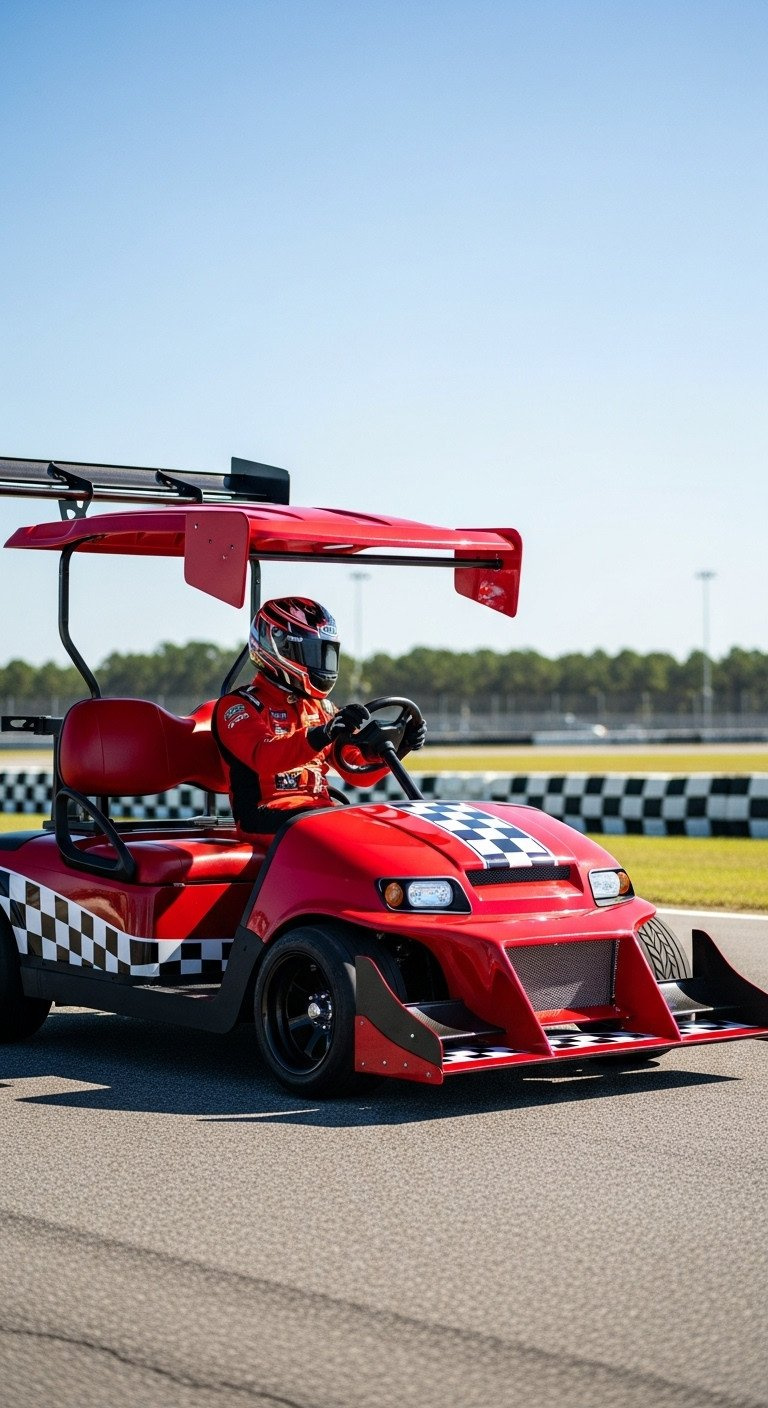
4. The Giant Race Car: Sleek, High-Speed Competition Look
Get the template for this high-impact race theme!
This race car golf cart theme creates a sleek, high-quality aesthetic that utilizes professional finishing techniques like vinyl wrapping and custom decals. It’s a great option for a semi-permanent look that feels polished and intentional.
Materials Needed:
- High-gloss automotive-grade vinyl wrap (for the base color)
- Computer-cut vinyl decals (numbers, stripes, faux sponsors)
- Lightweight ABS plastic or sealed foam board for the spoiler/air dam
- Heavy-duty outdoor mounting tape and industrial Velcro
- 12V DC LED underglow lighting strips (for night parades)
Step-by-Step Directions:
- Apply Base Wrap: Thoroughly clean the cart body. Apply the automotive-grade vinyl wrap using the wet application method for large areas to prevent bubbling (consult a tutorial). This creates the sleek, glossy base color.
- Add Racing Decals: Once the wrap is dry, apply the racing numbers and striping decals, ensuring alignment is precise and professional-looking.
- Mount the Spoiler: Fabricate the spoiler from lightweight plastic or foam. Secure it to the rear roof supports or luggage rack using strong adhesive and small screws/bolts, ensuring the mounting is rigid against wind.
- Install Underglow: Attach the LED strips along the bottom frame rail of the cart. Connect them to a properly fused 12V circuit, either through a voltage reducer or a dedicated external 12V battery pack.
- Accessorize: Install custom seat covers in a checkered or racing style and ensure the driver/passengers have matching racing helmets/gear to complete the high-speed illusion.
Pro-Tip: The key to a sleek look is the vinyl wrap. If you cannot apply a large wrap smoothly, hire a professional for the main body and reserve the DIY for smaller decals and props.
5. Under-the-Sea Atlantis: Integrating Light and Movement
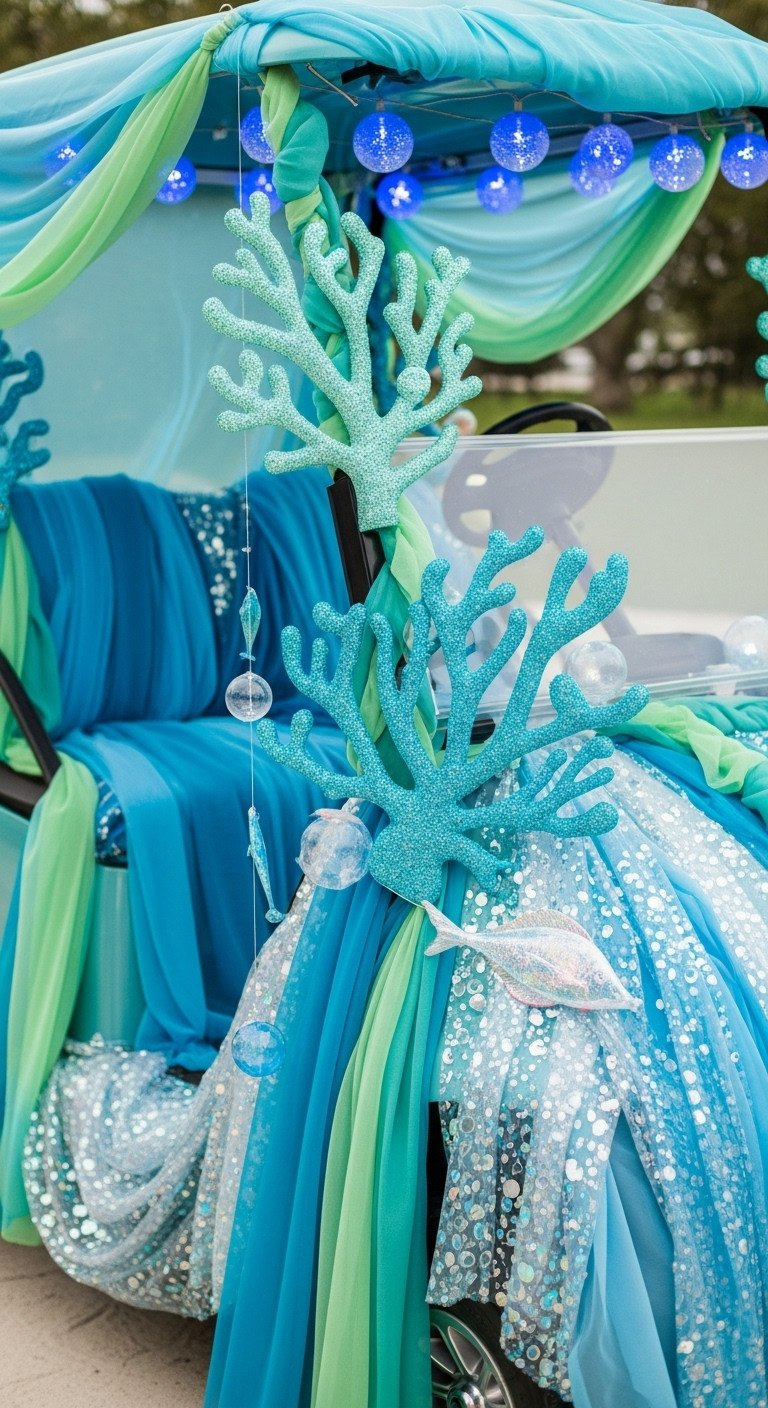
Share this immersive theme idea with your parade group!
The under the sea golf cart theme is perfect for creating an ethereal, immersive environment. It relies on flowing fabrics, specialized blue LED lights, and lightweight props to simulate an underwater world, scoring high on creativity and visual appeal.
Materials Needed:
- Several yards of lightweight, flowing aqua and royal blue tulle fabric
- Blue and green low-voltage LED globe lights (battery-powered)
- Large sheets of lightweight rigid insulation foam (for carving coral/rocks)
- Spray adhesive and glitter for coral detailing
- Clear fishing line and small eye hooks for suspending props
Step-by-Step Directions:
- Build the Coral Structure: Carve coral shapes from the rigid foam. Use spray adhesive and iridescent glitter to give them a wet, shimmering look. Secure the coral firmly to the cart rails and roof supports using strong, structural zip ties.
- Create Water Motion: Drape the blue and green tulle fabric from the roofline and secure it lightly at the cart base. Allow the excess fabric to flow and move slightly with the breeze or movement, mimicking water currents.
- Install Bubble Lights: Scatter the LED globe lights randomly across the roof and front of the cart to represent bubbles. Use clear fishing line to suspend lightweight foam fish and plastic plants so they appear to ‘swim’ in the fabric currents.
- Final Touches: Add blue underglow lighting beneath the cart to enhance the watery effect, especially at dusk. Use themed passenger costumes (mermaids, divers) to complete the illusion.
Pro-Tip: For the maximum “bubble” effect, search for battery-operated LED orb or sphere lights rather than standard string lights, and apply a thin layer of petroleum jelly to the lights to diffuse the glow.
6. The Sports Arena Tailgate: Spirit and Simplicity
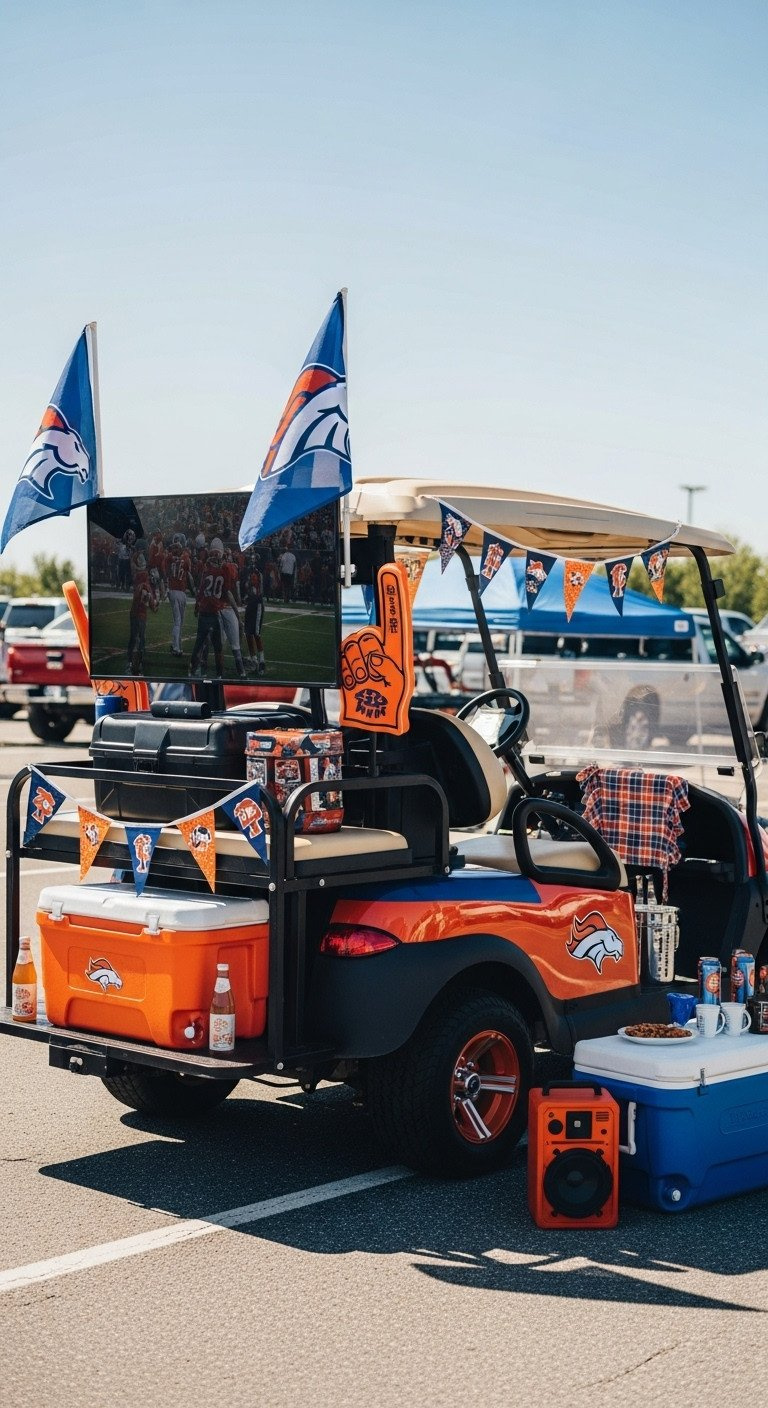
Save this spirited tailgate theme for your next game day!
This easy, high-impact theme is perfect for showing team spirit. The focus is on bold colors, iconic logos, and functional tailgate accessories like coolers and sound systems. It’s a great choice for frequent, non-competitive use.
Materials Needed:
- Team-colored fabric or magnetic vinyl sheets for quick attachment
- High-quality magnetic flagpole mounts
- Team flags and pennants
- Portable soundbar or speaker system
- Rear cargo basket/cooler mount
- Optional: Small portable projector and screen for viewing games
Step-by-Step Directions:
- Establish Base Colors: Use team-colored magnetic vinyl sheets to quickly cover the cart panels without damage, or use easily removable vinyl decals/stripes.
- Secure Flagpoles: Attach the magnetic flagpole mounts to the rear luggage rack or roof supports. Ensure the magnets are heavy-duty enough to withstand moderate speed and wind.
- Set Up Tailgate: Place the cooler and any food/drink preparation area securely in the rear basket. Use non-slip mats to prevent items from shifting.
- Integrate Audio/Video: Secure the portable speaker system (and projector, if using) using heavy-duty Velcro straps. Run any necessary wiring neatly and ensure the sound system runs off an independent battery pack to protect the cart’s battery.
- Add Flair: Drape team banners, attach foam fingers to the seats, and use team-colored LED strips for evening events.
Lesson Learned: If using a TV or projector, ensure it is extremely well-secured. Place the portable battery pack supplying the power beneath the seat or in a designated, ventilated box, not near heat sources.
7. The Retro Candy Land: Bright Colors and Oversized Props
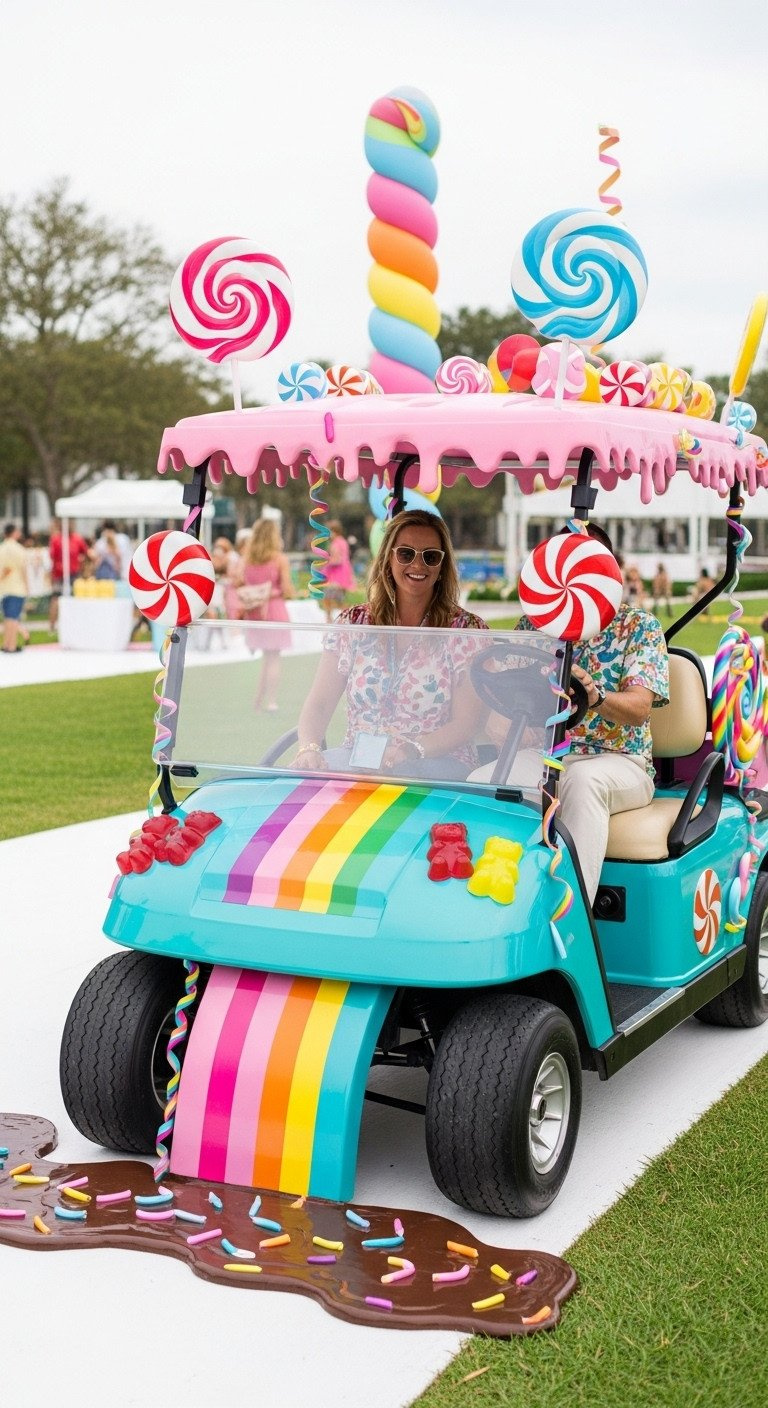
Get inspired by this high-contrast retro theme!
This visually striking, family-friendly theme leverages bright colors and oversized props for maximum impact. The key to making this Candy Land golf cart theme a success is achieving a super glossy finish on all the custom-fabricated candy pieces.
Materials Needed:
- Sheets of high-density polystyrene foam (for carving large candy props)
- High-gloss, UV-resistant acrylic paint (bubblegum pink, turquoise, lemon yellow)
- Clear, outdoor-rated polyurethane gloss sealant
- Heavy-duty pipe clamps and bolts (for attaching large lollipops/swirls)
- Striped vinyl or duct tape for accents
Step-by-Step Directions:
- Carve and Seal Props: Carve the desired candy shapes (lollipops, gumdrops) from the foam. Paint with the bright, high-gloss colors. Once dry, apply 2-3 coats of the polyurethane gloss sealant to achieve maximum shine and weather resistance.
- Attach Oversized Props: Secure the largest props (like the lollipops) using heavy-duty pipe clamps that grip the roof struts, extending vertically to draw the eye. Reinforce with industrial-strength Velcro to prevent turning or swaying.
- Add Stripes/Swirls: Use the striped vinyl tape to quickly create swirling patterns on the cart body panels, maximizing the retro, sugary aesthetic.
- Under-Cart Draping: Use bright, solid-colored fabric (pink or blue) to drape along the lower body of the cart, hiding the tires slightly and creating a clean, float-like base.
Pro-Tip: The key to this theme is gloss. Use only high-gloss paint and sealant, and ensure all props look freshly coated and slightly wet for maximum visual appeal.
8. The Floral Garden Float: Elegance and Detail
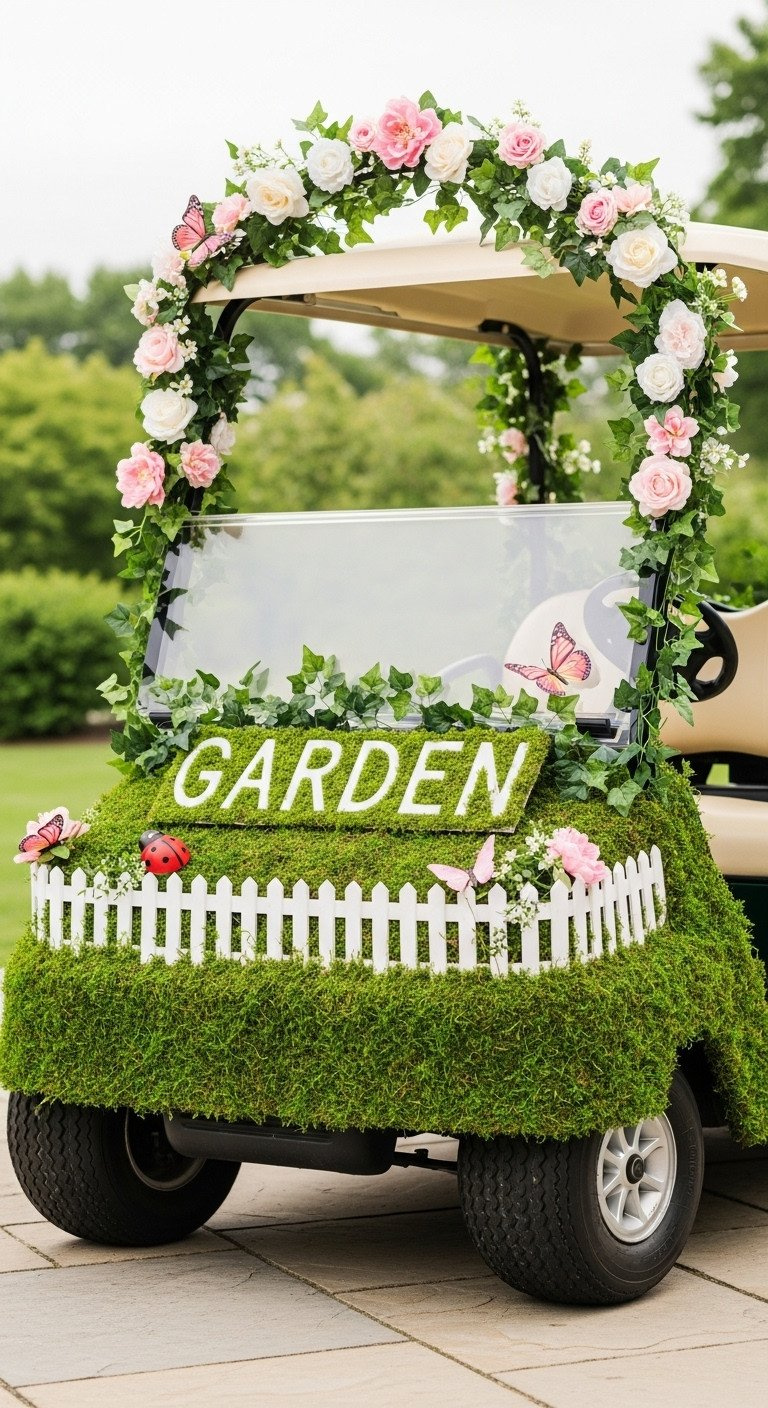
Pin this beautiful floral float tutorial for your spring parade!
For a traditional, elegant parade float, this garden theme is a timeless winner. It relies on densely packed, high-quality faux flowers and ivy to create a lush, detailed appearance that scores high on craftsmanship.
Materials Needed:
- High-quality, UV-resistant artificial flower garlands and ivy
- Lightweight chicken wire or plastic mesh (for building the archway)
- Small, prefabricated lightweight wooden picket fence panels
- Industrial-strength hot glue gun and glue sticks
- Green zip ties (to blend with foliage)
Step-by-Step Directions:
- Construct the Archway: Bend the chicken wire or mesh into an arch shape over the roof. Secure this frame to the cart’s roof supports using heavy-duty zip ties or clamps.
- Install the Fence Base: Temporarily secure the lightweight fence panels around the perimeter of the cart, especially around the lower base, using non-marring clamps on the fender or frame.
- Attach Foliage: Begin weaving the artificial ivy and flower garlands onto the chicken wire archway and fence panels, using the hot glue gun and green zip ties to secure everything tightly. The denser the coverage, the better the final effect.
- Add Detail: Use small amounts of floral wire to attach individual butterflies, birds, or ladybug accents randomly throughout the foliage, giving the impression of life and movement.
- Weatherproofing Check: Ensure all glued parts are secure and the flowers/ivy can withstand wind and minor precipitation.
Pro-Tip: Layering different shades and types of green foliage (e.g., ivy, moss, fern) before adding the flowers adds significant depth and quality to the final result, making it look more realistic.
9. The Minimalist Luxury Yacht: Clean Lines and High-End Accents
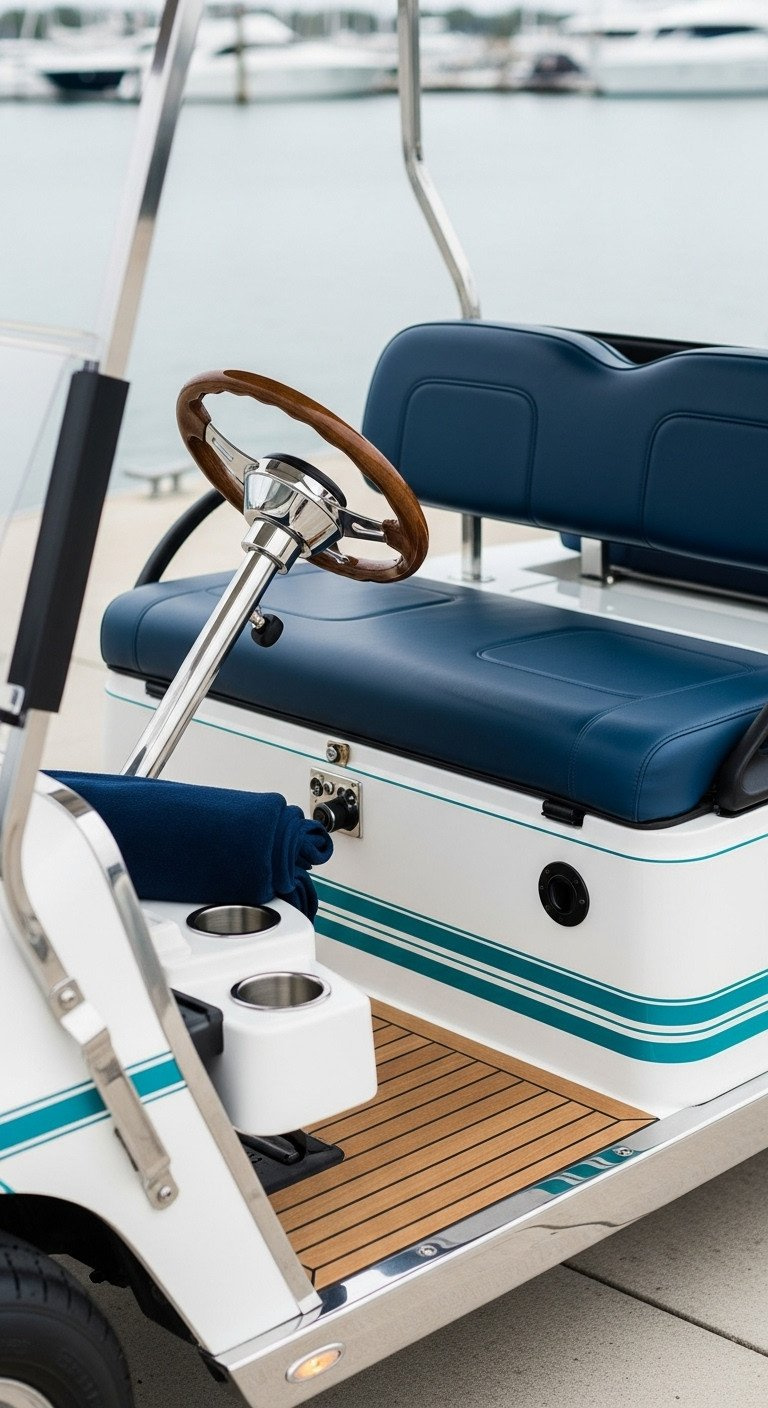
Save this elegant yacht theme for year-round style!
For a sophisticated, permanent modification, the minimalist luxury yacht theme is unbeatable. It focuses on clean lines, high-end materials like marine-grade vinyl and teak accents, and subtle details to create a look suitable for daily use in upscale communities.
Materials Needed:
- High-quality, glossy white marine-grade vinyl wrap
- Teak wood-grain vinyl striping for accent lines
- Custom wood-grain golf cart steering wheel replacement
- Navy blue marine vinyl fabric (for upholstery)
- Stainless steel or chrome rail accessories and trim
Step-by-Step Directions:
- Apply Base Wrap: Thoroughly clean the cart. Apply the white marine-grade vinyl wrap to all body panels for a crisp, yacht-like base.
- Add Teak Accents: Apply thin strips of the teak wood-grain vinyl horizontally along the side panels or across the roof edge to mimic the look of deck planking.
- Upgrade Steering/Upholstery: Professionally or carefully replace the stock steering wheel with the custom wood-grain wheel (ensure compatibility). Re-cover or purchase new seats in deep navy blue marine-grade vinyl for durability and color contrast.
- Install Ambient Lighting: Install small, recessed, warm-white LED marker lights along the bottom side panels of the cart, running the wiring neatly through the frame and connecting it to a properly fused 12V source (via a voltage reducer).
- Final Polish: Add stainless steel cup holders, chrome wheel covers, and ensure all trim pieces are polished for a high-end finish.
Lesson Learned: Check your cart model and year before ordering a replacement steering wheel, as adapter kits are often required for proper fit and function. Prioritize marine-grade materials for maximum longevity and UV resistance.
10. The Sci-Fi Spaceship Cruiser: High-Tech Lighting Focus

Get the advanced wiring tutorial for this high-tech theme!
This futuristic sci-fi theme utilizes cutting-edge lighting technology to create a truly unique spectacle. By using addressable RGB LED strips and a microcontroller, you can program dynamic lighting effects that are guaranteed to win points for technical execution and originality.
Materials Needed:
- Silver or charcoal metallic vinyl wrap
- Lightweight foam board (for creating angular ‘armor’ plating)
- Addressable RGB LED strip lights (WS2812B or similar)
- Microcontroller board (e.g., Arduino or dedicated strip controller)
- Dedicated external 12V battery and fused connection kit
Step-by-Step Directions:
- Apply Base Wrap & Armor: Apply the metallic vinyl wrap for the base color. Fabricate and secure angular foam plating to the cart’s sides using industrial adhesive and discrete fasteners to create a futuristic look.
- Plan LED Placement: Strategically place the addressable LED strips along the edges of the angular foam panels and underneath the cart to emphasize movement and speed.
- Wire and Program: This step is complex: Connect the LED strips to the microcontroller. The controller must be powered by the dedicated external 12V battery pack. Program the controller for dynamic, sequential light patterns (e.g., ‘warp drive,’ ‘laser fire’). (Warning: Consult electrical expert for wiring safety.)
- Conceal Wires: Use flexible black conduit tubing to hide all wiring neatly along the cart frame and into the battery box/controller location. Visible wires severely detract from the aesthetic.
- Sound Integration: Incorporate futuristic sound effects (whooshes, robotic voices) through a synchronized sound system.
Pro-Tip: Focus on using the addressable LEDs for movement, not just static colors. Dynamic effects like ‘chasing’ or ‘scanning’ lights greatly increase the visual appeal and score highly on contest criteria for technical ingenuity.
11. The Permanent Custom Wrap: Year-Round Aesthetic Enhancement
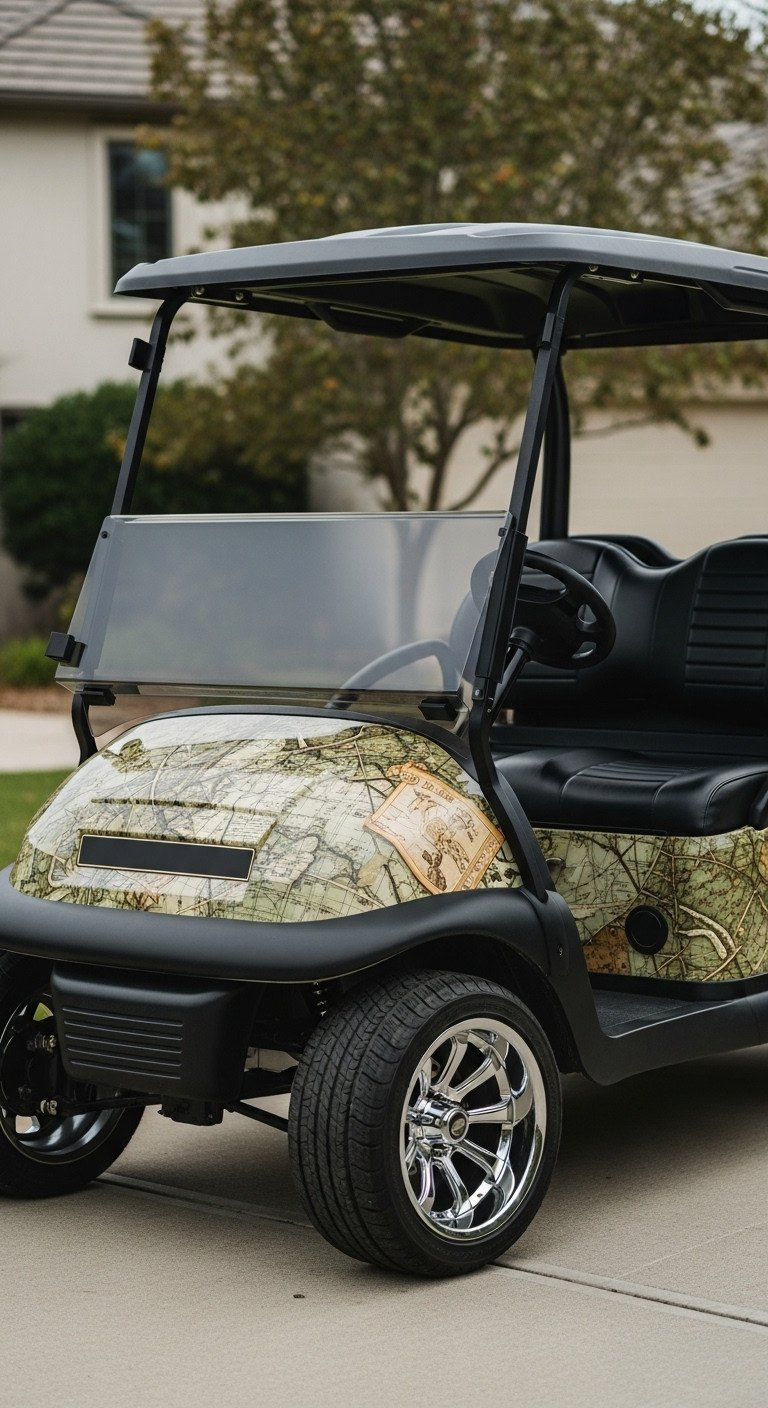
Pin this long-term aesthetic investment idea!
For those who want a high-quality, long-term solution, a custom vinyl wrap is the ultimate in personalization. It offers a professional, durable finish and acts as a protective layer for the original paint, making it a smart investment for year-round style.
Materials Needed:
- High-quality 3M or Avery permanent vehicle vinyl wrap
- Professional installation kit (squeegee, heat gun, cutting tools)
- Isopropyl alcohol and lint-free cloth (for surface prep)
- Optional: Clear protective layer (laminate) for high-wear areas
Step-by-Step Directions:
- Design and Order: Design or commission the custom graphic wrap, ensuring the design is correctly templated for your specific golf cart make and model.
- Surface Preparation (CRITICAL): Remove all accessories (lights, bumpers, handles). Wash the cart thoroughly, then wipe every panel down with isopropyl alcohol to remove all residue and oils. The wrap relies on a perfectly clean surface.
- Professional Application: For full-cart coverage, professional application is strongly recommended to avoid bubbles, wrinkles, and misalignment. If applying decals only, use the heat gun and squeegee technique, starting from the center and working outwards.
- Post-Heating: Use a heat gun on all edges and recessed areas after application. This “sets” the wrap and prevents peeling or lifting over time.
- Maintenance: Use wrap-specific cleaning solutions. Avoid pressure washing directly on seams or edges to maximize the wrap’s lifespan.
Pro-Tip: A full vinyl wrap acts as a protective layer for the original paint. Choose a vinyl that includes a UV-resistant coating to prevent fading, ensuring your custom look lasts for 5+ years.
Key Takeaways: Your Quick Guide to Contest-Winning Decor
Winning a golf cart decoration contest comes down to mastering three key areas: a cohesive and creative theme, rock-solid structural security for all props, and safe, isolated electrical power for your lights and effects.
The 5 Pillars of Contest-Winning Golf Cart Decor
- Rule 1: Theme Coherence: Your theme must be immediately recognizable and the decorations, costumes, and music must align perfectly. This often accounts for 40% of the judging score.
- Rule 2: Structural Integrity: Use robust mounting techniques (clamps, U-bolts, industrial zip ties) with redundant attachments. Decorations must withstand wind and cart movement without falling off or shifting.
- Rule 3: Power Isolation: Never power extensive lighting directly from the cart’s main drive batteries. Utilize a fused DC-DC converter for small loads, or use separate, external battery packs for high-draw items like fog machines or sound systems.
- Rule 4: Maximize Visibility: Use layered lighting (underglow, accent, prop lighting) and height (masts, arches) to ensure the cart is impactful from all spectator angles, day or night.
- Rule 5: Driver Safety: The driver’s field of vision, the functionality of all street-legal lights (if LSV), and steering clearance must remain completely unobstructed by decorations or props.
FAQs About Golf Cart Decorating Ideas
How do I safely power LED lights on a 48V golf cart?
The safest method is to install a properly fused, low-amp DC-to-DC voltage reducer that steps the cart’s high voltage (36V or 48V) down to 12V. This isolates the accessory power draw from the main battery pack while providing the correct voltage for standard LED strip lights. For high-amperage lights, use a separate, external deep-cycle battery pack.
What is the best material for custom, lightweight props on a parade float?
Extruded Polystyrene (XPS) insulation foam board and PVC piping are the best materials. XPS foam is extremely lightweight, easy to carve, and, once sealed with polyurethane, offers decent weather resistance. PVC piping provides a strong, cost-effective structural frame that secures easily to the cart’s existing supports.
Are there any decorations that could damage my golf cart’s finish?
Yes, using standard duct tape, masking tape, or corrosive adhesives can damage paint or plastic finishes. Always use specialized, automotive-grade products like professional 3M VHB tape, industrial Velcro, or high-quality zip ties. When removing adhesives, use a specialized, non-abrasive automotive adhesive remover.
What are the common judging criteria in golf cart decoration contests?
Contest judges typically evaluate three primary areas: Originality and Creativity (often weighted highest, 40-50%), Theme Interpretation and Coherence (how well the concept is executed), and Quality/Craftsmanship (material finishing, structural integrity, and overall visual appeal).
Do I need a professional to install a vinyl wrap on my golf cart?
For a seamless, full-cart custom graphic wrap, professional installation is highly recommended. While simple decals can be applied DIY, large wraps require specialized tools, clean room conditions, and extensive experience to prevent bubbles and peeling, ensuring maximum durability and longevity.
Final Thoughts
It takes more than just lights and tinsel to win a decoration contest; it takes a strategic blend of visual creativity, structural knowledge, and electrical safety. By focusing on high-concept themes, utilizing high-quality, weatherproof materials, and correctly managing your cart’s power supply, you transform your golf cart into a memorable masterpiece. Don’t let technical concerns hold back your vision. Which of these 11 genius themes are you planning to master for your next contest? Let us know in the comments
Last update on 2026-01-17 / Affiliate links / Images from Amazon Product Advertising API

